Docker #
I installed Docker because I will primarily be using Docker Compose to manage all my services. While I hope to pivot to a more elegant configuration with Kubernetes, Podman, and traefik in the future, this was the easiest way to get started.
After a Docker Compose file was written, the containers were started with:
docker compose up -d
Services #
Most of the services I hosted were fairly straightforward and didn’t require much trouble shooting. I will mention if any tweaks for a particular service were required.
Many configurations below have environmental variables for a Process User ID (PUID) and Process Group ID (PGID). These can both be found with id $USER.
Syncthing #
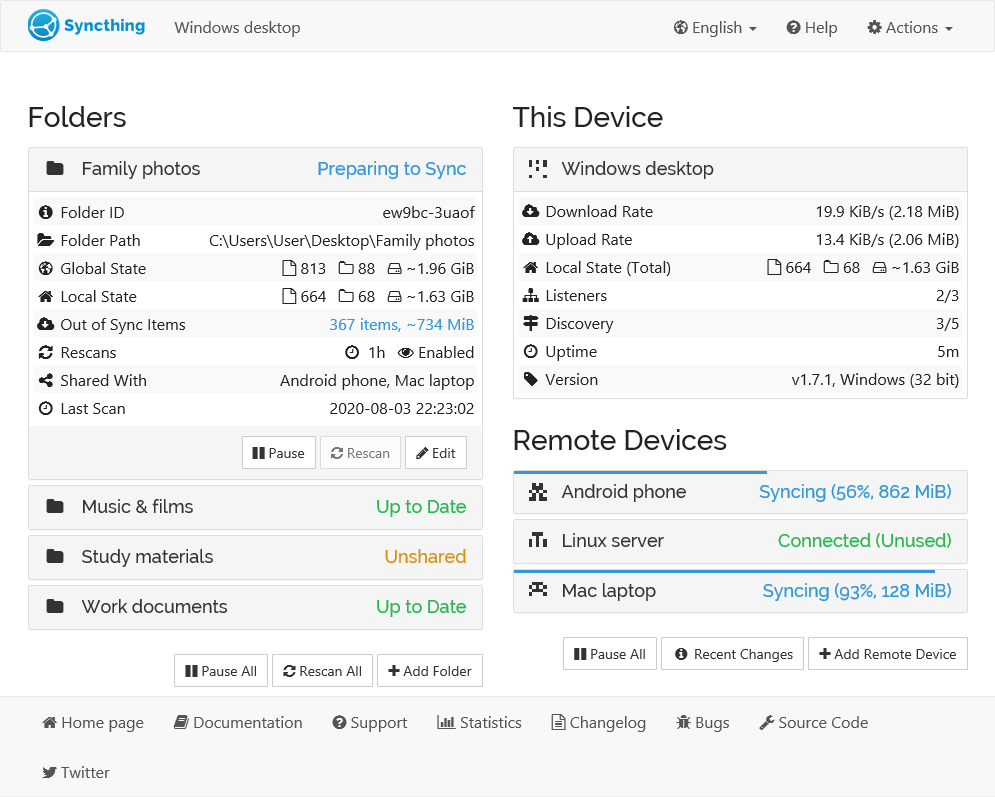
Syncthing is a continuous file synchronization program that securely syncs folders between devices in real time. This server’s folder was designated as the primary folder for other devices to sync from. I used this for password and authentication databases, as well as any other files that required cross-device syncing.
While it probably would have been best to install Syncthing as a docker container, I installed it straight into the OS.
Installation #
To allow the system to check the packages authenticity, you need to provide the release key.
# Add the release PGP keys:
sudo mkdir -p /etc/apt/keyrings
sudo curl -L -o /etc/apt/keyrings/syncthing-archive-keyring.gpg https://syncthing.net/release-key.gpg
The stable-v2 channel is updated with stable release builds, usually every first Tuesday of the month.
# Add the "stable-v2" channel to your APT sources:
echo "deb [signed-by=/etc/apt/keyrings/syncthing-archive-keyring.gpg] https://apt.syncthing.net/ syncthing stable-v2" | sudo tee /etc/apt/sources.list.d/syncthing.list
The candidate channel is updated with release candidate builds, usually every second Tuesday of the month. These predate the corresponding stable builds by about three weeks.
# Add the "candidate" channel to your APT sources:
echo "deb [signed-by=/etc/apt/keyrings/syncthing-archive-keyring.gpg] https://apt.syncthing.net/ syncthing candidate" | sudo tee /etc/apt/sources.list.d/syncthing.list
And finally.
# Update and install syncthing:
sudo apt-get update
sudo apt-get install syncthing
By default, Syncthing is only set to listen on localhost, meaning that you cannot access the Web User Interface (WebUI) remotely. I had to use SSH tunneling to bind it’s port to one on my remote machine:
ssh -L 9898:localhost:8384 vm-user@IP
Now the WebUI can be viewed at http://localhost:9898 on my remote machine.
I edited Actions > GUI > GUI Listen Address to 0.0.0.0:8384 to make the web interface accessible from any network interface on the host.
I made sure to protect it with a username and password at:
Actions > GUI > GUI Authentication UserActions > GUI > GUI Authentication Password
NGINX #
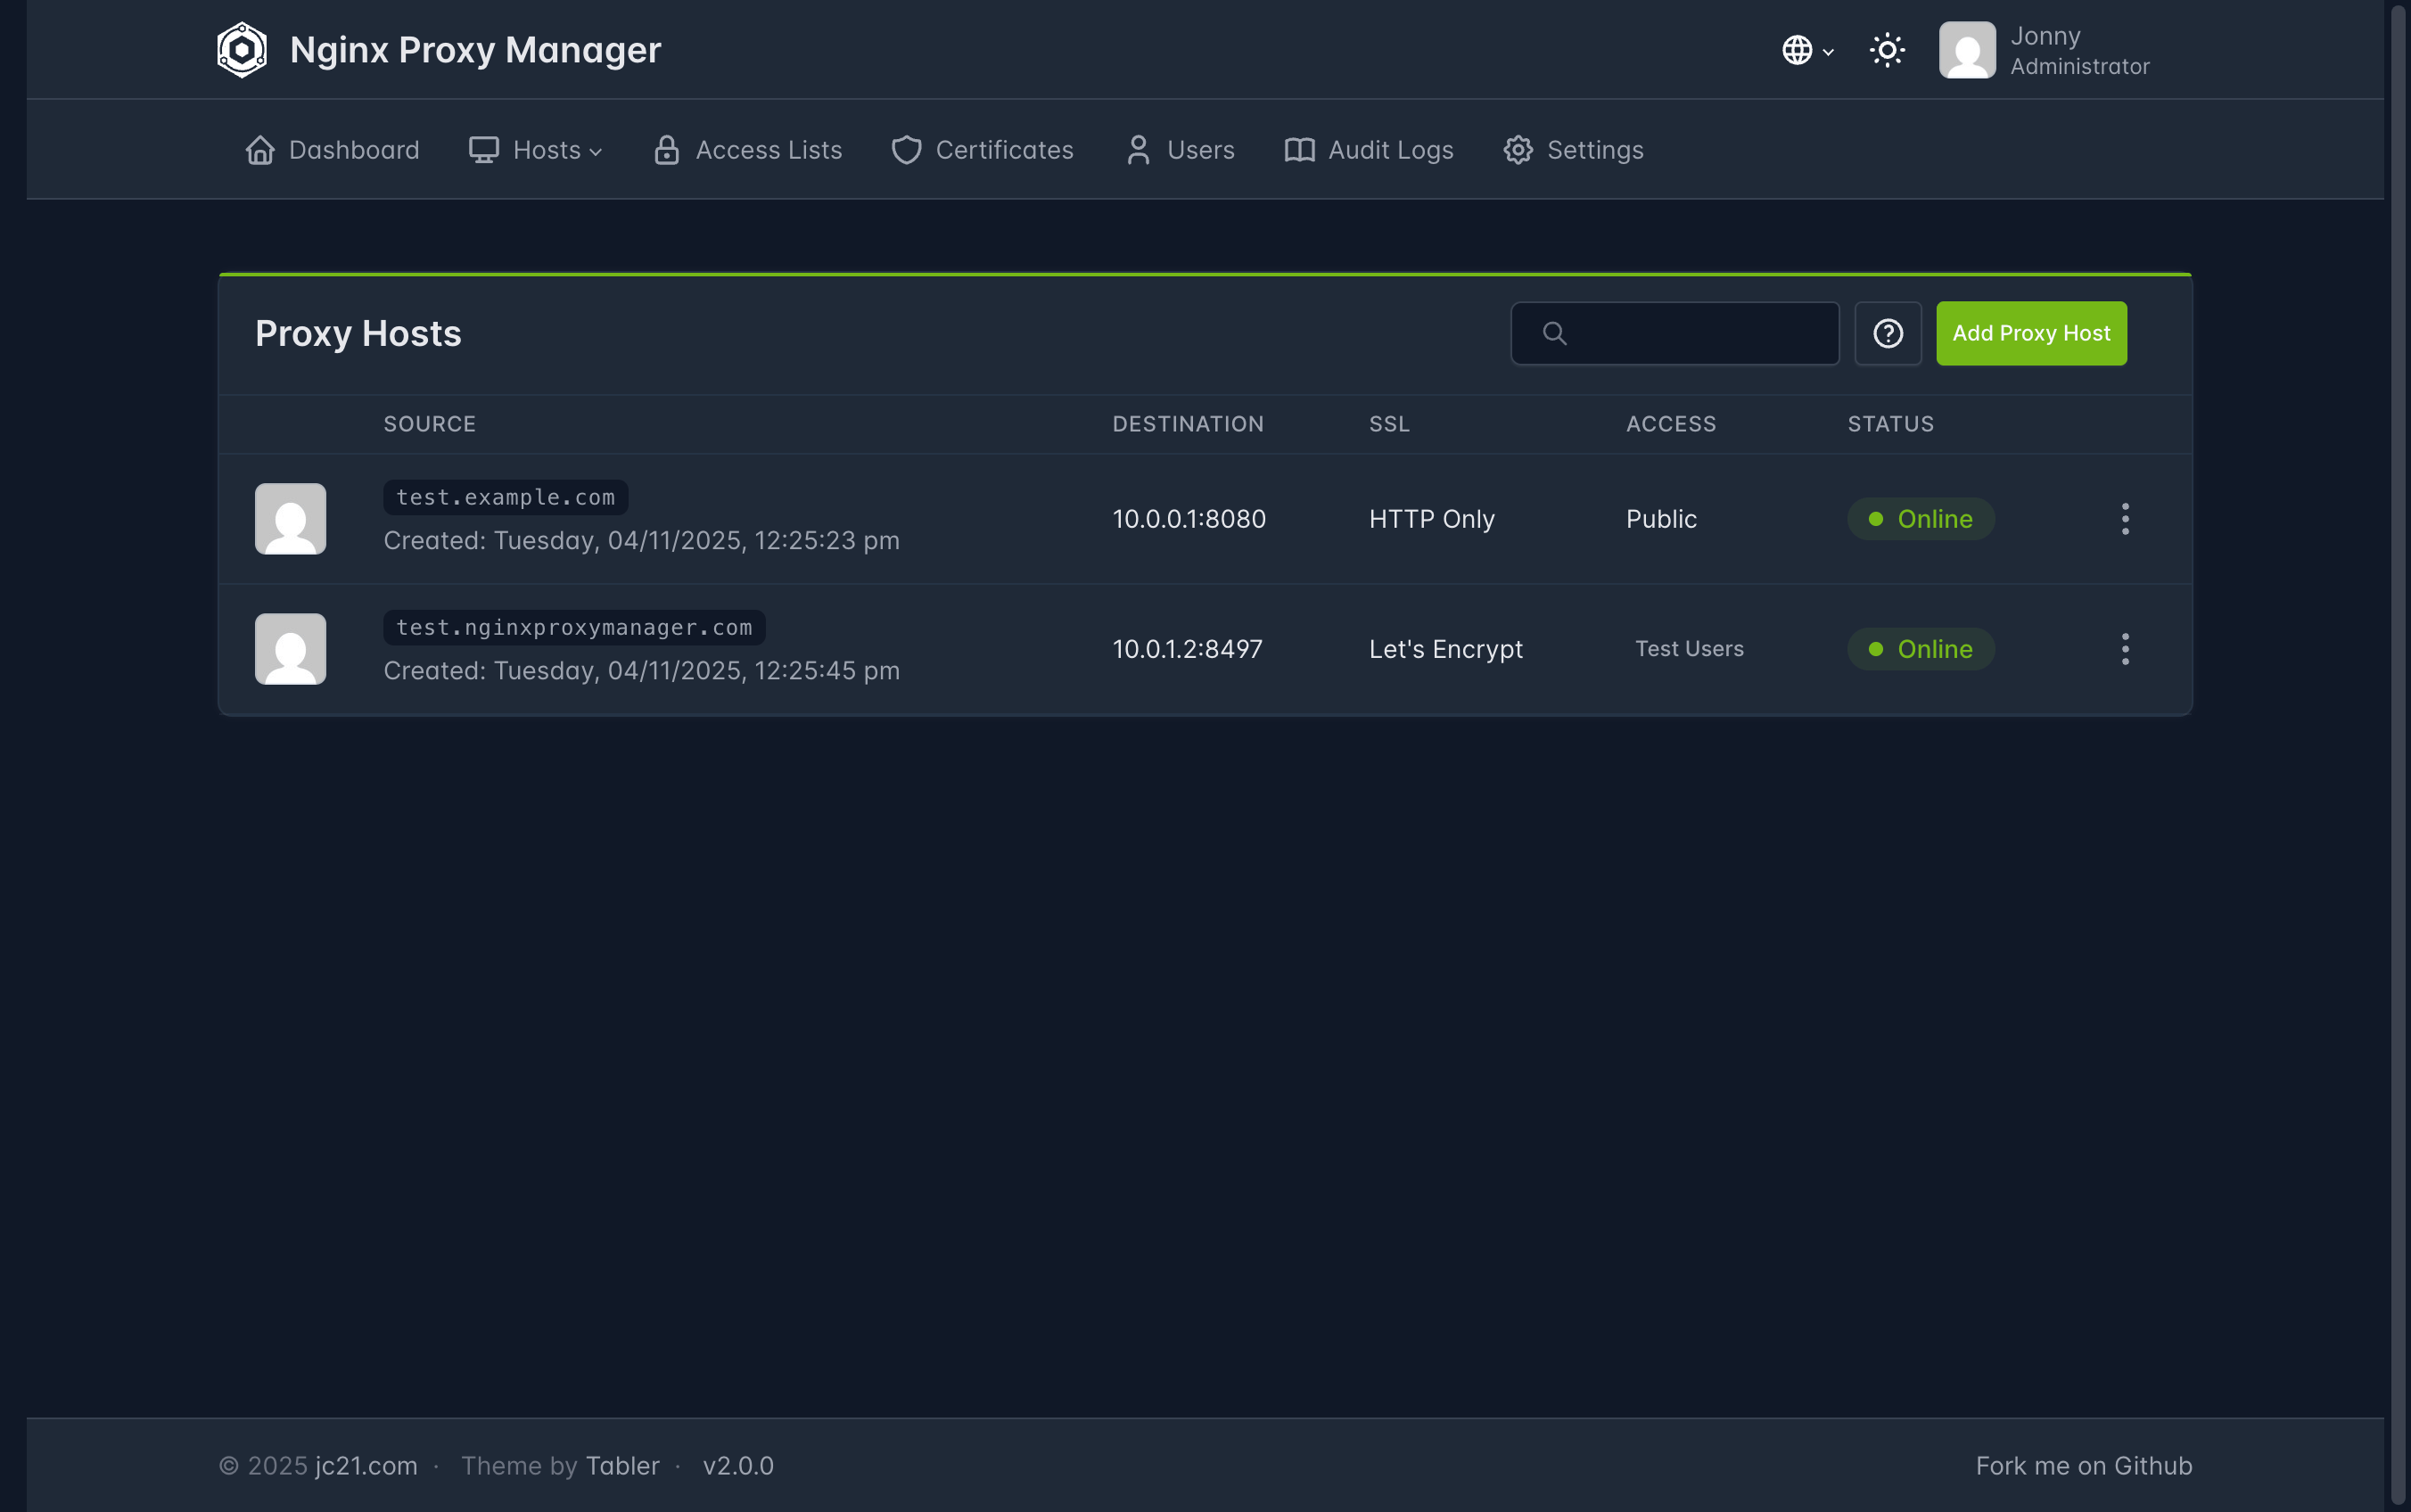
NGINX proxy manager is a reverse proxy that handles incoming traffic and, when configured, load balances it across the server(s) it manages. In my case, this allowed me to map human‑readable domain names to the IP addresses of my services.
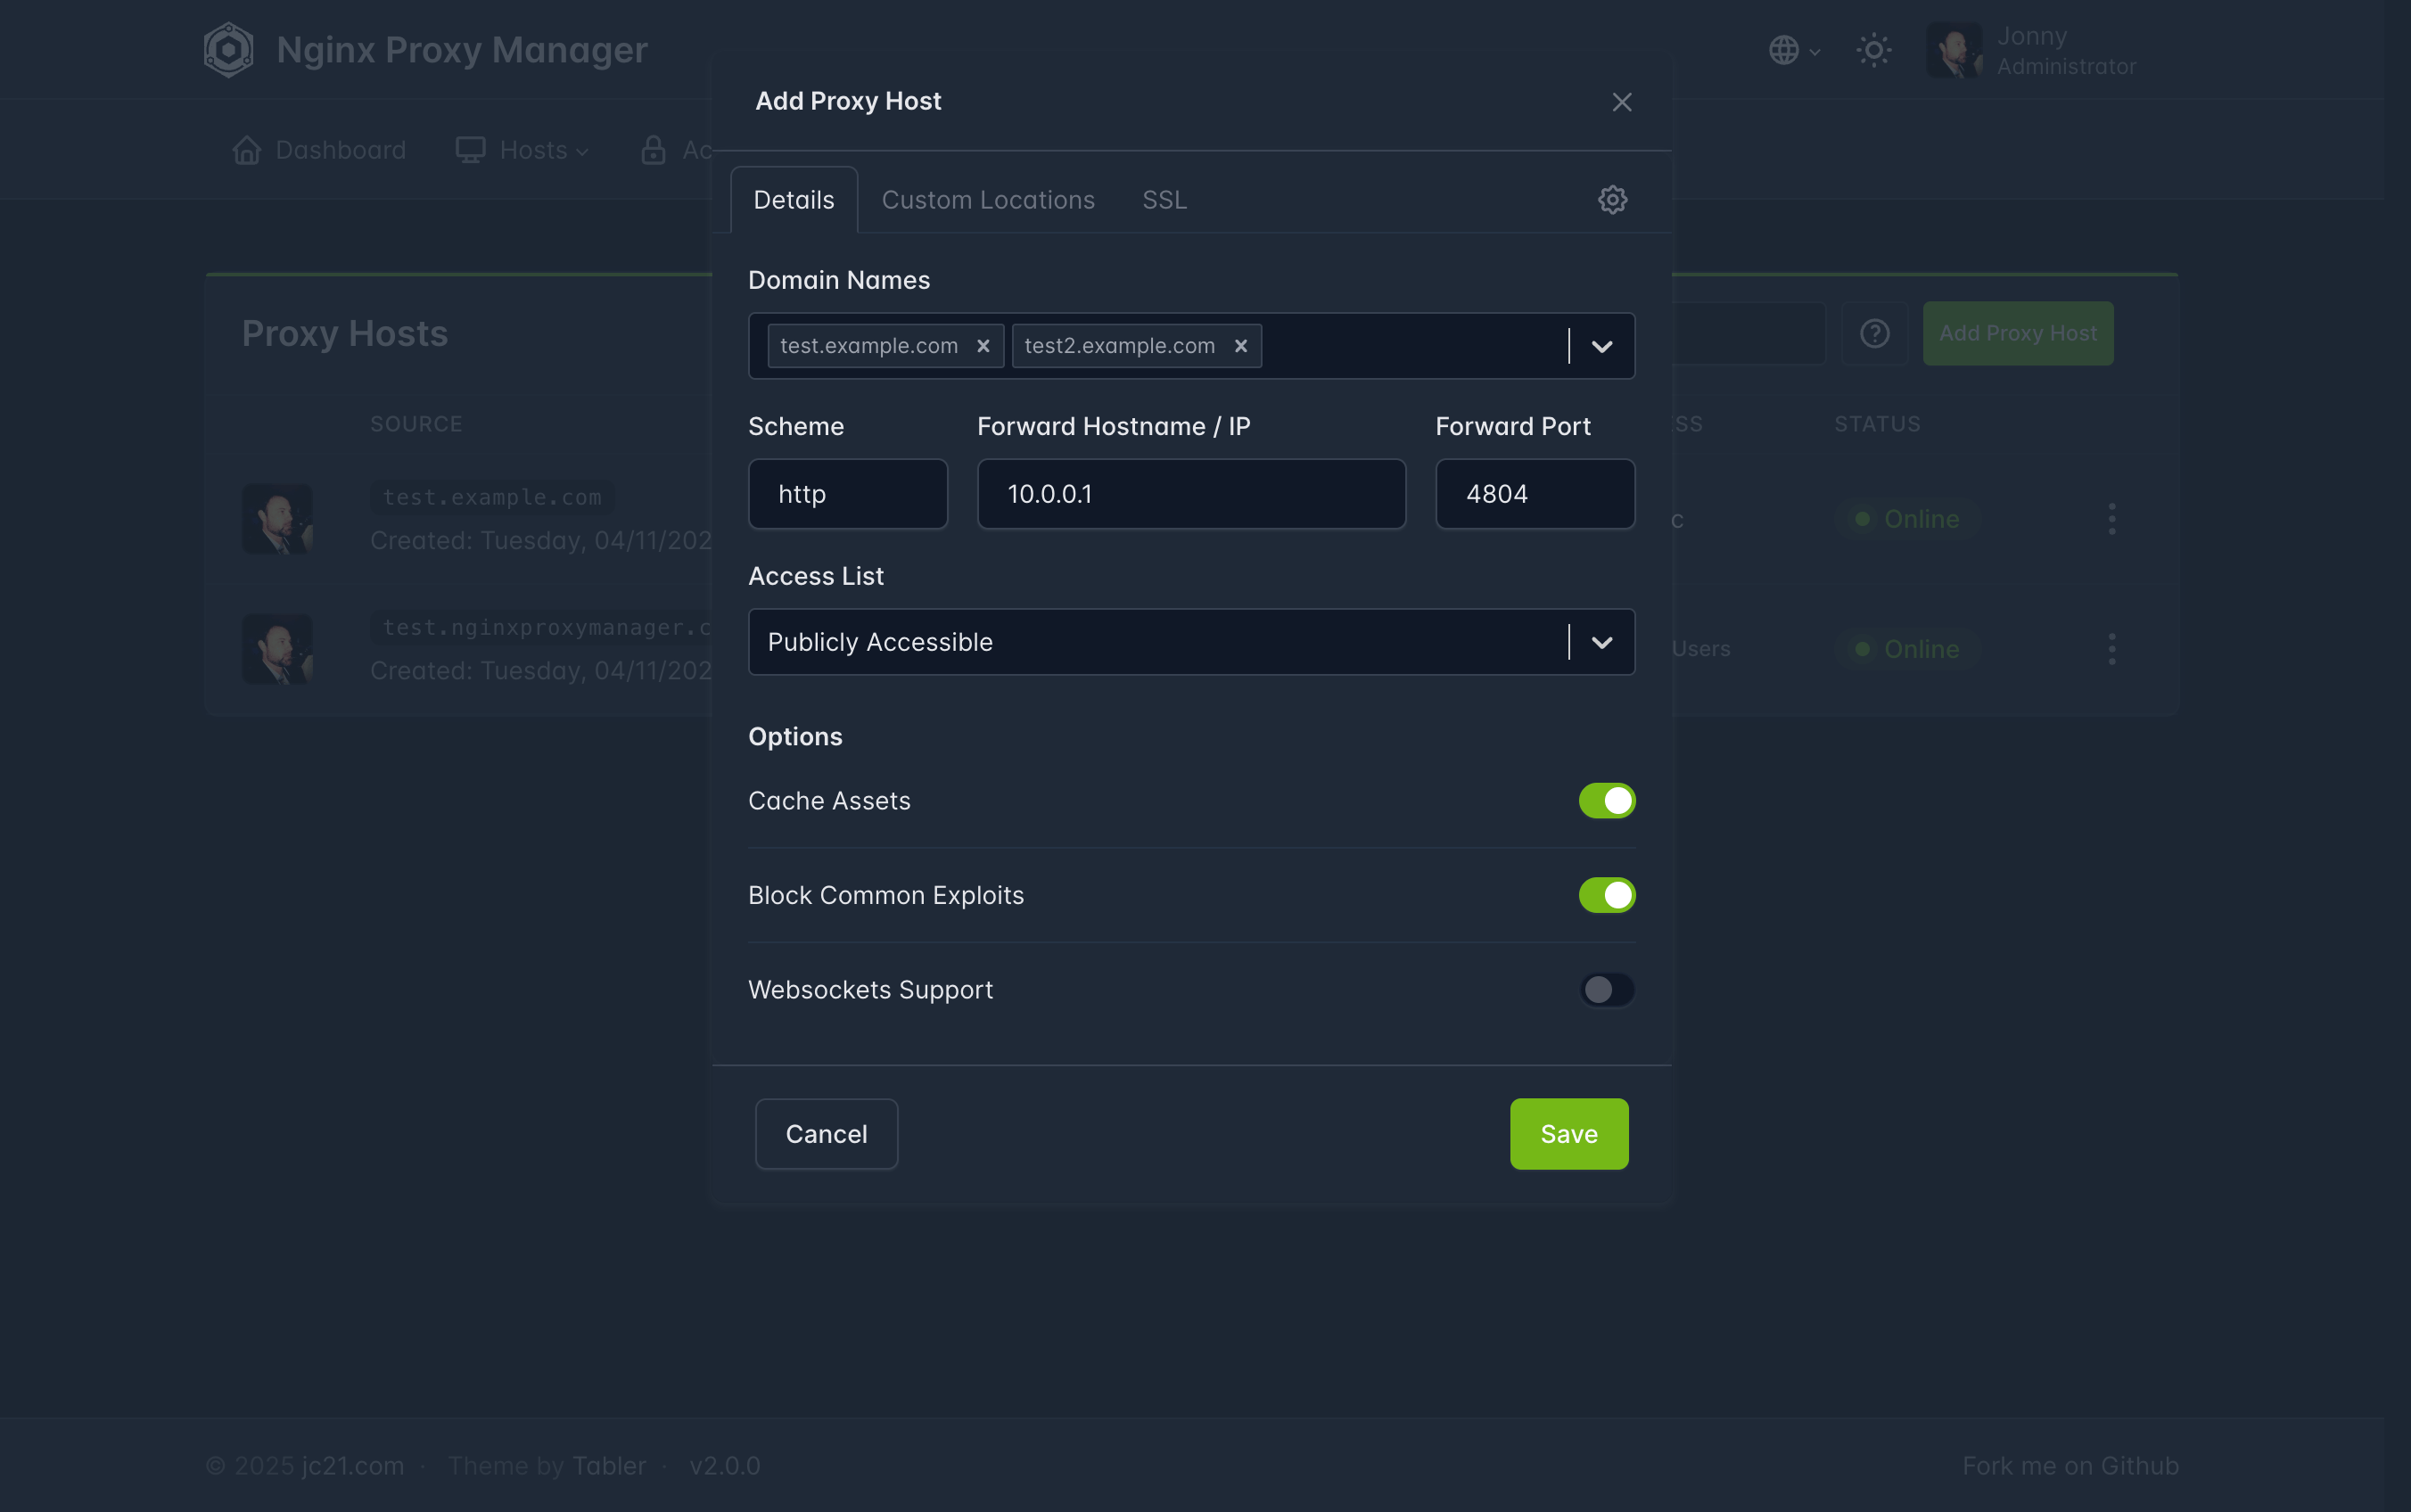
When creating a new proxy host, it first asks for a Forward Hostname / IP. Using the local IP limits access to your home network only, while the Tailscale IP allows access from both inside and outside. I created two domains per service—service_name.tail.mydomain.com for external use and service_name.local.mydomain.com for internal—but this required many entries and separate SSL certificates. Using just the Tailscale IP would be a better idea since it works everywhere.
After inputting an IP, there are three optional settings: Cache Assets, Block Common Exploits, and Websockets support. All three can be useful, but Websockets support is often essential for proper application functionality, so I always enabled it.
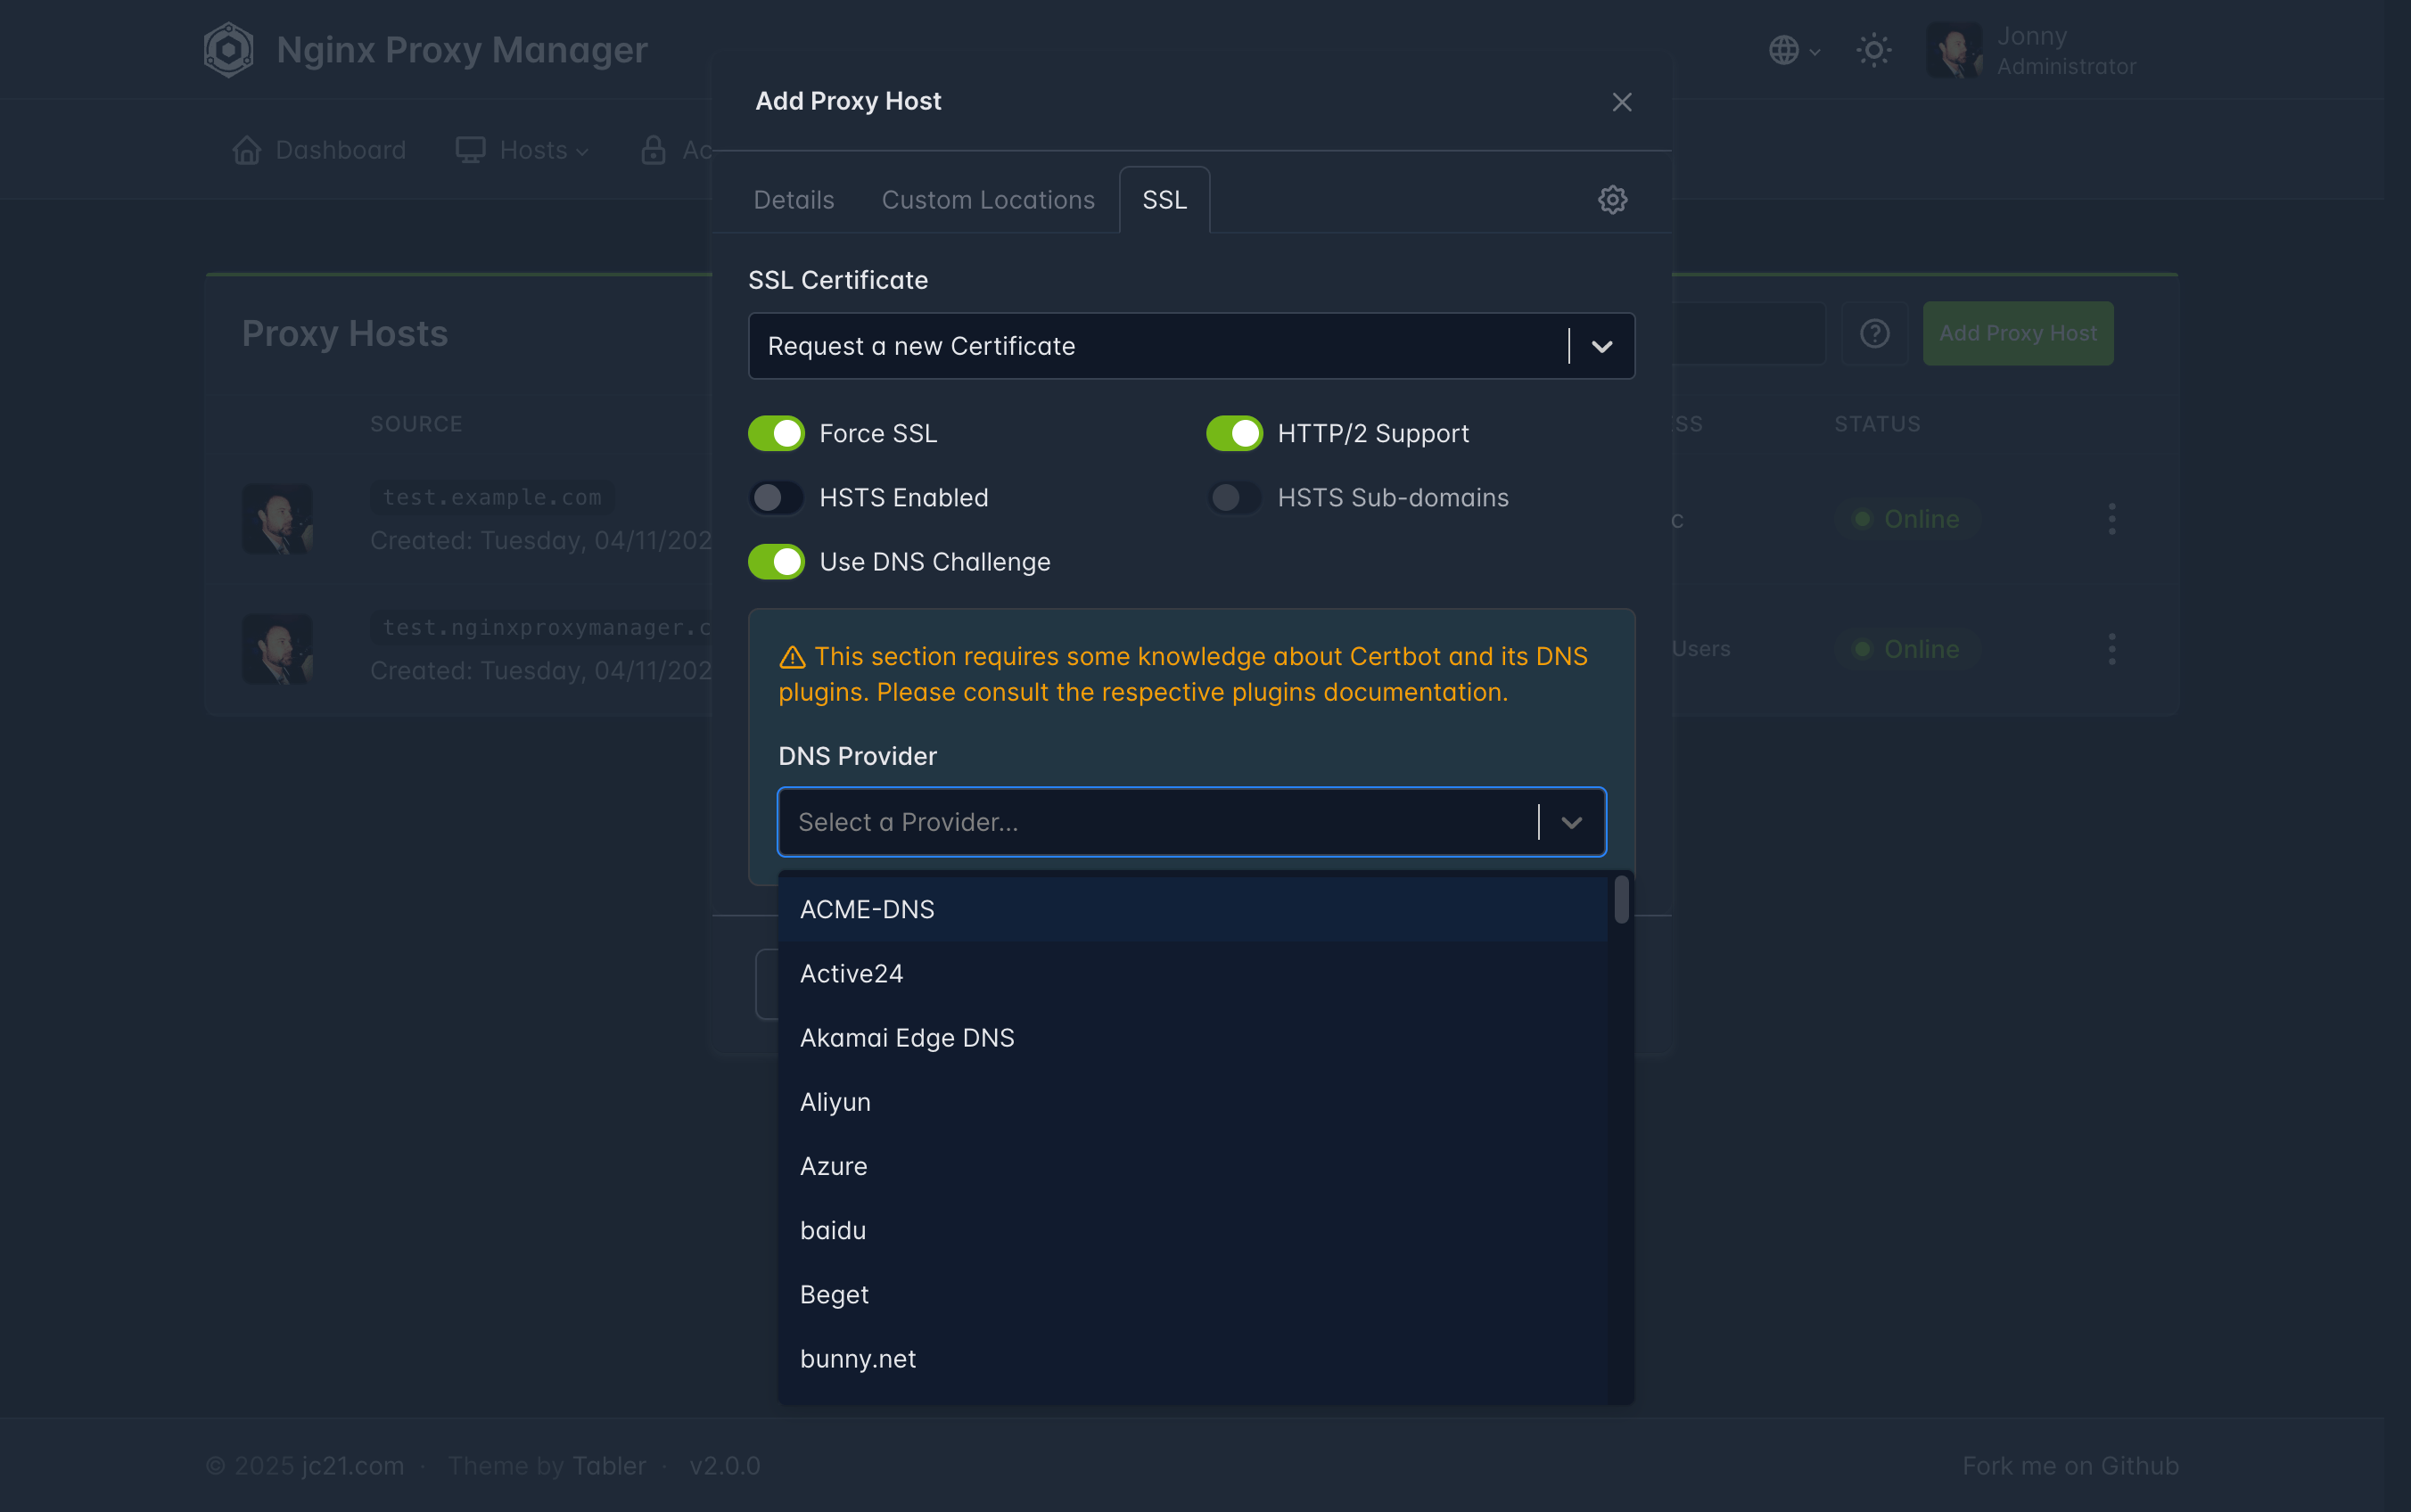
When adding an SSL certificate, it is common to enable HTTP/2 Support and Force SSL to improve performance and ensure all traffic is encrypted. For Use DNS Challenge, you will need one or more API keys from your DNS provider or domain registrar.
Docker Compose #
The default configuration uses a SQLite database. Consult the documentation if you’d like to use a different database instead.
services:
  app:
    image: 'jc21/nginx-proxy-manager:latest'
    restart: unless-stopped
    ports:
      # These ports are in format <host-port>:<container-port>
      - '80:80' # Public HTTP Port
      - '81:81' # Public HTTPS Port
      - '443:443' # Admin Web Port
    volumes:
      - ./data:/data
      - ./letsencrypt:/etc/letsencrypt
Watchtower #
Watchtower is an application that will monitor your running Docker containers and watch for changes to the images that those containers were originally started from. If watchtower detects that an image has changed, it will automatically restart the container using the new image. — Watchtower
Effectively, Watchtower is an auto-update service for your docker containers.
Docker Compose #
version: "3"
services:
  watchtower:
    image: containrrr/watchtower
    volumes:
      - /var/run/docker.sock:/var/run/docker.sock
Beszel #
Originally I thought of using Prometheus and Grafana for server monitoring, but for the little that I was keeping track of, I figured they might be a bit overkill.
Beszel was a much more lightweight option that came in two parts: the hub and the agent. The hub is the central GUI dashboard that is installed on the server. The agent is a lightweight program that you install any server—or PC—that you would like the monitor. To attach an agent to the hub, first create a public key and add it to the agent’s Docker Compose file.
Docker Compose — Hub #
services:
  beszel:
    image: henrygd/beszel:latest
    container_name: beszel
    restart: unless-stopped
    ports:
      - 8090:8090
    volumes:
      - ./beszel_data:/beszel_data
Docker Compose — Agent #
services:
  beszel-agent:
    image: "henrygd/beszel-agent"
    container_name: "beszel-agent"
    restart: unless-stopped
    network_mode: host
    volumes:
      - /var/run/docker.sock:/var/run/docker.sock:ro
      # monitor other disks / partitions by mounting a folder in /extra-filesystems
      # - /mnt/disk/.beszel:/extra-filesystems/sda1:ro
    environment:
      LISTEN: 45876
      KEY: <PUB_KEY>
Speedtest Tracker #

It does exactly what it says on the tin.
Speedtest Tracker tracks network speed and health using Ookla’s CLI tool—this information is then presented in their GUI frontend.
Docker Compose #
You must first create an application key via:
echo -n 'base64:'; openssl rand -base64 32;
-
The default Compose file uses a SQLite database. Consult the documentation if a different database is desired.
-
Add any additional desired environmental variables.
-
I set
SPEEDTEST_SCHEDULEto run every 20 minutes. This is displayed as a crontab format which you can translate here. -
Edit
SPEEDTEST_SERVERSto include the servers closest to you for the most accurate results. You can find all servers and their ids here. -
I set
PRUNE_RESULTS_OLDER_THANto 30. This deletes records after they are 30 days old.
services:
  speedtest-tracker:
    image: lscr.io/linuxserver/speedtest-tracker:latest
    container_name: speedtest-tracker
    environment:
      - PUID=<PUID>
      - PGID=<PGID>
      - APP_KEY=<APP_KEY>
      - APP_URL=
      - DB_CONNECTION=sqlite
      - SPEEDTEST_SCHEDULE=*/20 * * * *
      - SPEEDTEST_SERVERS=<server1, server2, server3, etc.>
      - PRUNE_RESULTS_OLDER_THAN=30
    volumes:
      - ./speedtest-tracker/data:/config
    ports:
      - 8087:80
      - 8449:443
    restart: unless-stopped
Flame #
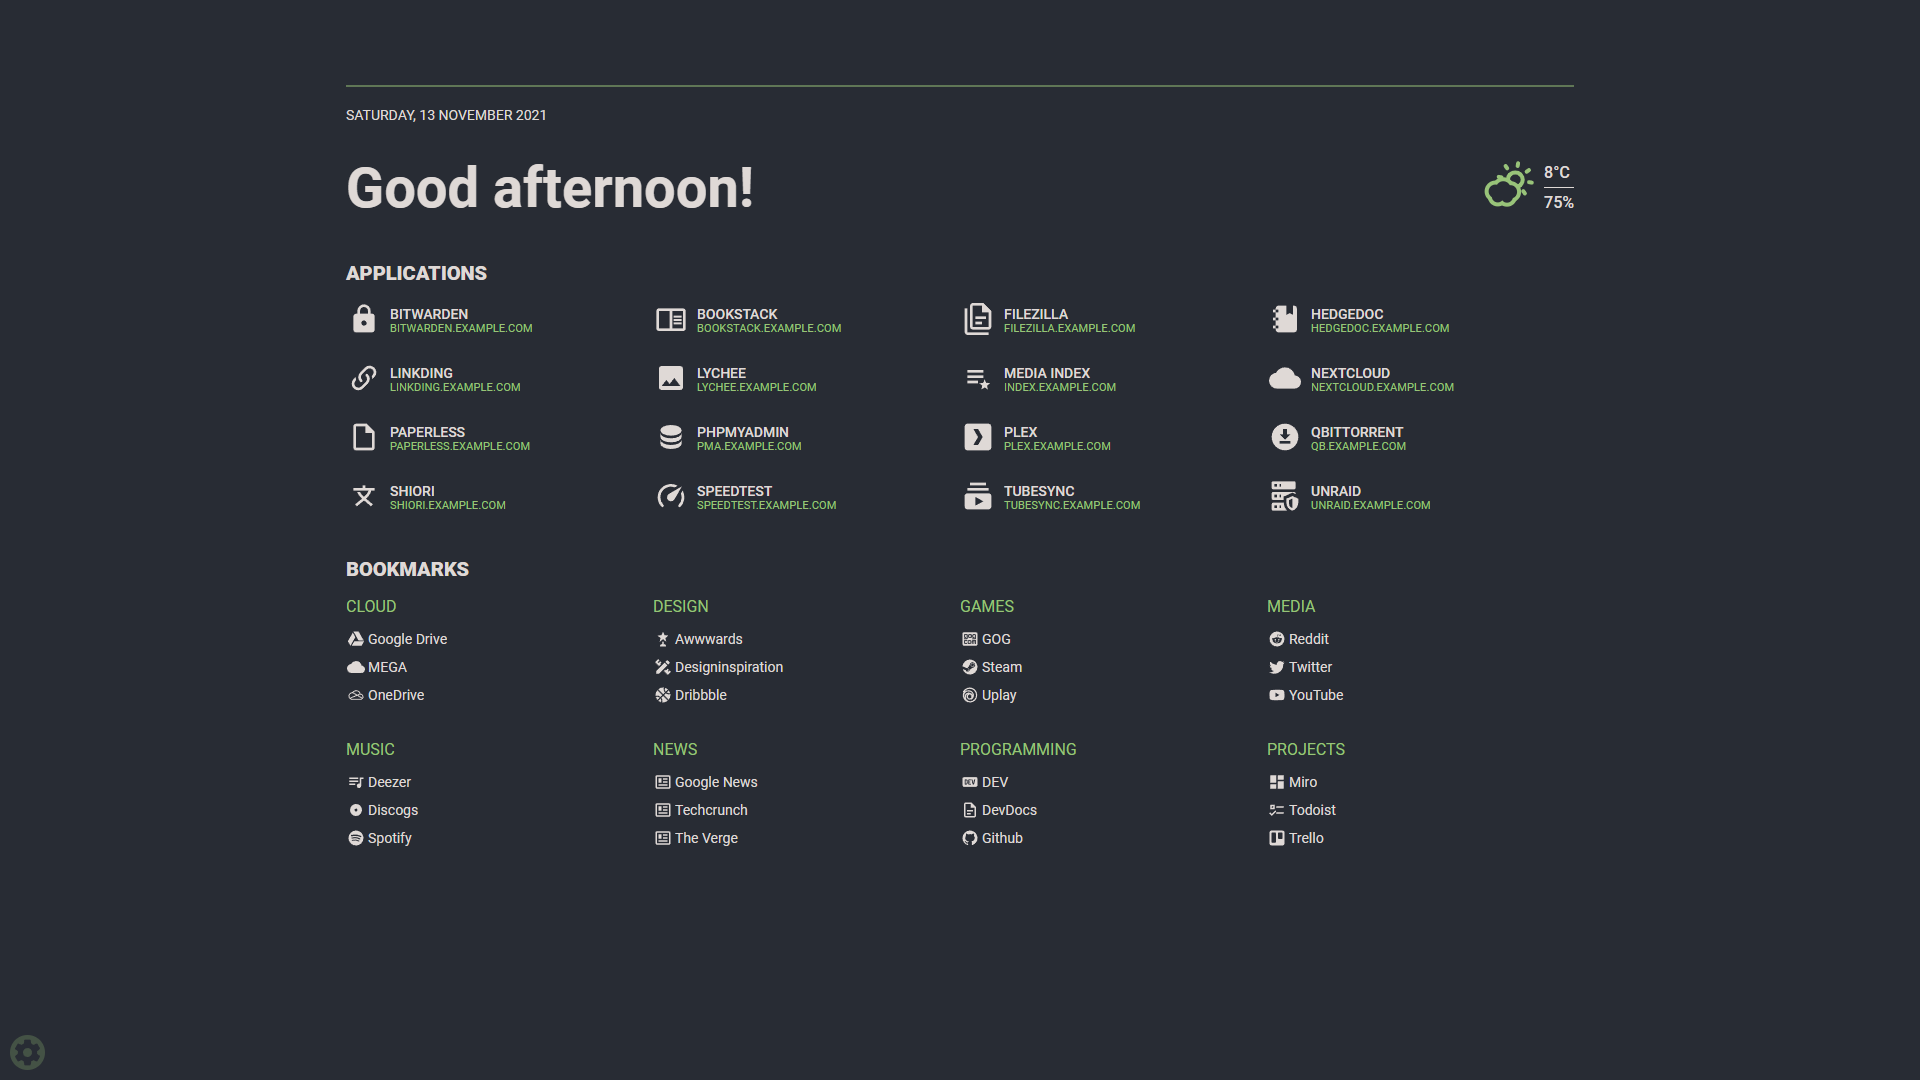
I used to use Homarr, but I found it to be a bit sluggish and full of features I did not use. I switched to Flame, a minimalist and lightweight homepage.
I set Flame’s link as my browser homepage. It presents all my services and useful bookmarks. The search function supports numerous prefixes, but automatically searches locally first. If nothing is found in the Flame database, it sends the query to a search engine.
Docker Compose #
Flame requires a password for authentication, which can be set using Docker secrets. Run sudo chmod 600 on your credentials file to restrict access to it. Docker will still be able to read the file since it runs as root.
services:
  flame:
    image: pawelmalak/flame
    container_name: flame
    volumes:
      - ./data:/app/data
      - /var/run/docker.sock:/var/run/docker.sock # optional but required for Docker integration
    ports:
      - 5005:5005
    secrets:
      - password
    restart: unless-stopped

secrets:
  password:
    file: ~/flame/.credentials
After the service is up make sure to login.
Immich #
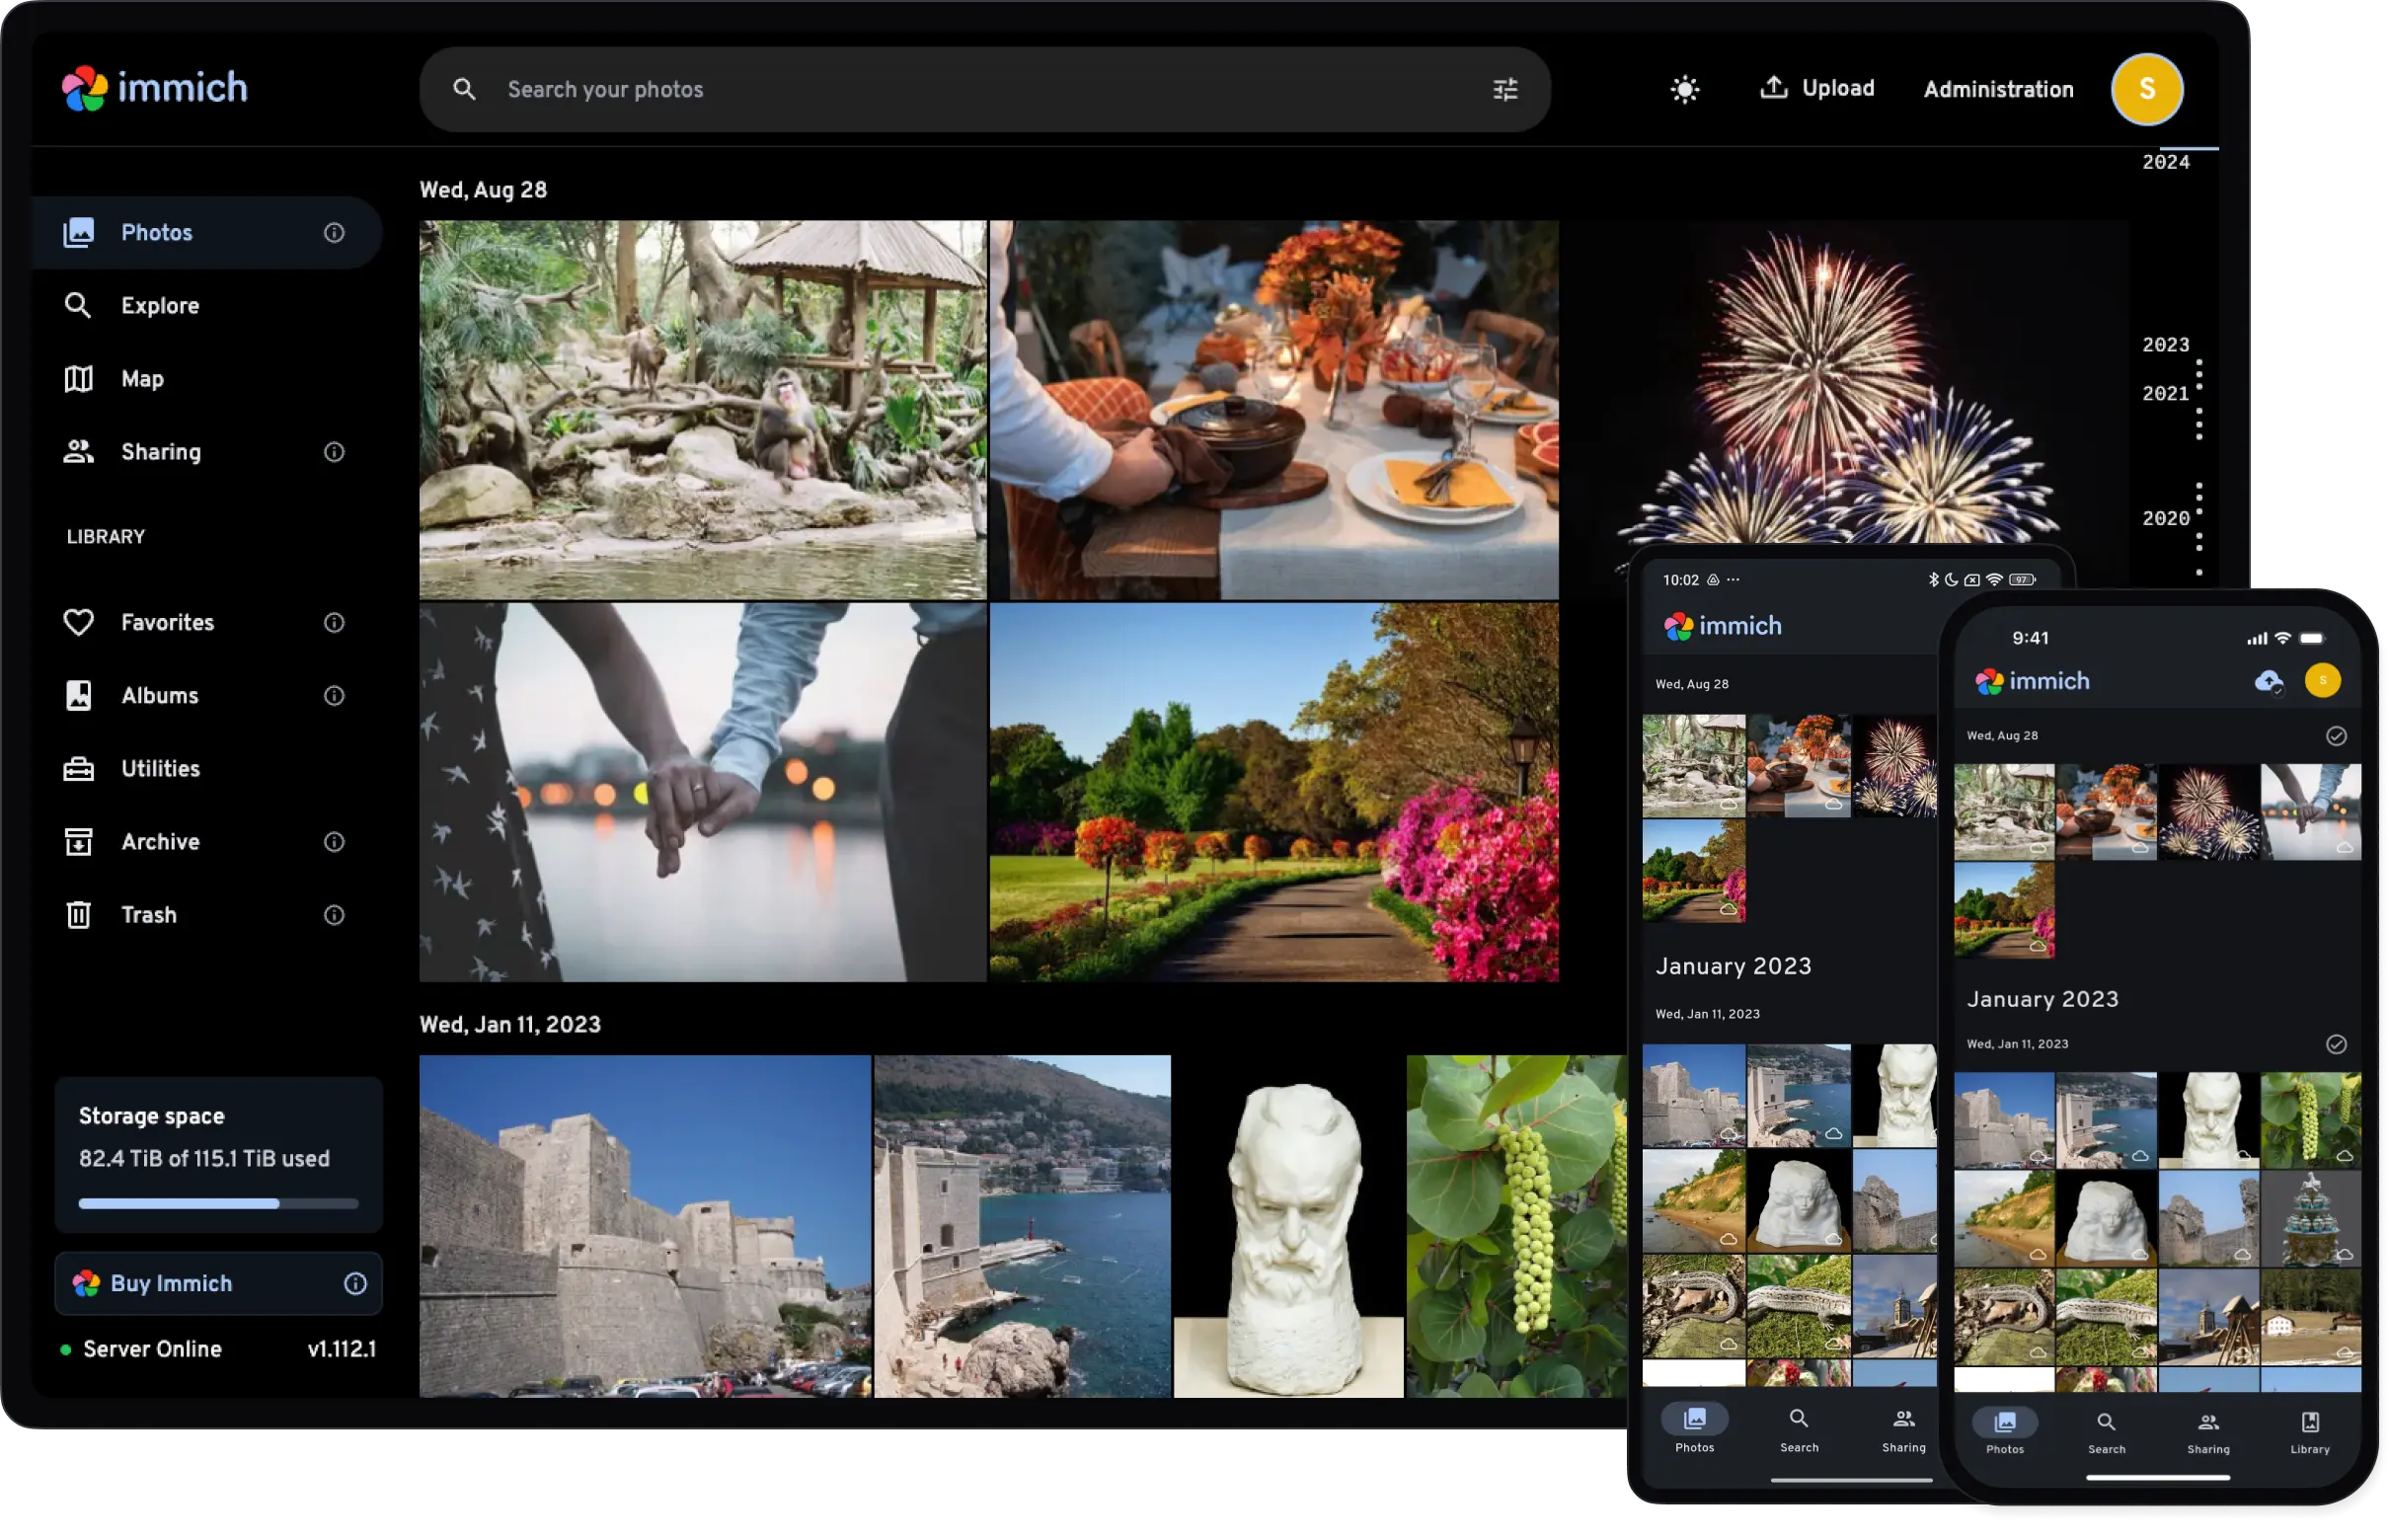
Immich is a self-hosted storage solution that aims to be a true alternative to Google Photos and iCloud Photos. It’s fast, snappy, and feature rich with many more on the way. The accompanying mobile app is equally polished, and a joy to use.
I bought an individual license to support the project.
Docker Compose #
The Docker Compose file also creates a container that uses machine learning for features like facial recognition and smart search. If you do not want machine learning or these features, comment out the immich-machine-learning portion of the Compose file.
I didn’t have any environment variables I wanted to change but if you do make sure to pull the file:
wget -O .env https://github.com/immich-app/immich/releases/latest/download/example.env
The current Docker Compose file can always be downloaded with:
wget -O docker-compose.yml https://github.com/immich-app/immich/releases/latest/download/docker-compose.yml
Make sure to rename example.env to .env before starting the container.
name: immich

services:
  immich-server:
    container_name: immich_server
    image: ghcr.io/immich-app/immich-server:${IMMICH_VERSION:-release}
    # extends:
    #   file: hwaccel.transcoding.yml
    #   service: cpu # set to one of [nvenc, quicksync, rkmpp, vaapi, vaapi-wsl] for accelerated transcoding
    volumes:
      # Do not edit the next line. If you want to change the media storage location on your system, edit the value of UPLOAD_LOCATION in the .env file
      - ${UPLOAD_LOCATION}:/usr/src/app/upload
      - /etc/localtime:/etc/localtime:ro
    env_file:
      - .env
    ports:
      - '2283:2283'
    depends_on:
      - redis
      - database
    restart: always
    healthcheck:
      disable: false

  immich-machine-learning:
    container_name: immich_machine_learning
    # For hardware acceleration, add one of -[armnn, cuda, rocm, openvino, rknn] to the image tag.
    # Example tag: ${IMMICH_VERSION:-release}-cuda
    image: ghcr.io/immich-app/immich-machine-learning:${IMMICH_VERSION:-release}
    # extends: # uncomment this section for hardware acceleration - see https://immich.app/docs/features/ml-hardware-acceleration
    #   file: hwaccel.ml.yml
    #   service: cpu # set to one of [armnn, cuda, rocm, openvino, openvino-wsl, rknn] for accelerated inference - use the `-wsl` version for WSL2 where applicable
    volumes:
      - model-cache:/cache
    env_file:
      - .env
    restart: always
    healthcheck:
      disable: false

  redis:
    container_name: immich_redis
    image: docker.io/valkey/valkey:8-bookworm@sha256:fec42f399876eb6faf9e008570597741c87ff7662a54185593e74b09ce83d177
    healthcheck:
      test: redis-cli ping || exit 1
    restart: always

  database:
    container_name: immich_postgres
    image: ghcr.io/immich-app/postgres:14-vectorchord0.4.3-pgvectors0.2.0
    environment:
      POSTGRES_PASSWORD: ${DB_PASSWORD}
      POSTGRES_USER: ${DB_USERNAME}
      POSTGRES_DB: ${DB_DATABASE_NAME}
      POSTGRES_INITDB_ARGS: '--data-checksums'
      # Uncomment the DB_STORAGE_TYPE: 'HDD' var if your database isn't stored on SSDs
      # DB_STORAGE_TYPE: 'HDD'
    volumes:
      # Do not edit the next line. If you want to change the database storage location on your system, edit the value of DB_DATA_LOCATION in the .env file
      - ${DB_DATA_LOCATION}:/var/lib/postgresql/data
    restart: always

volumes:
  model-cache:
Jellyfin #
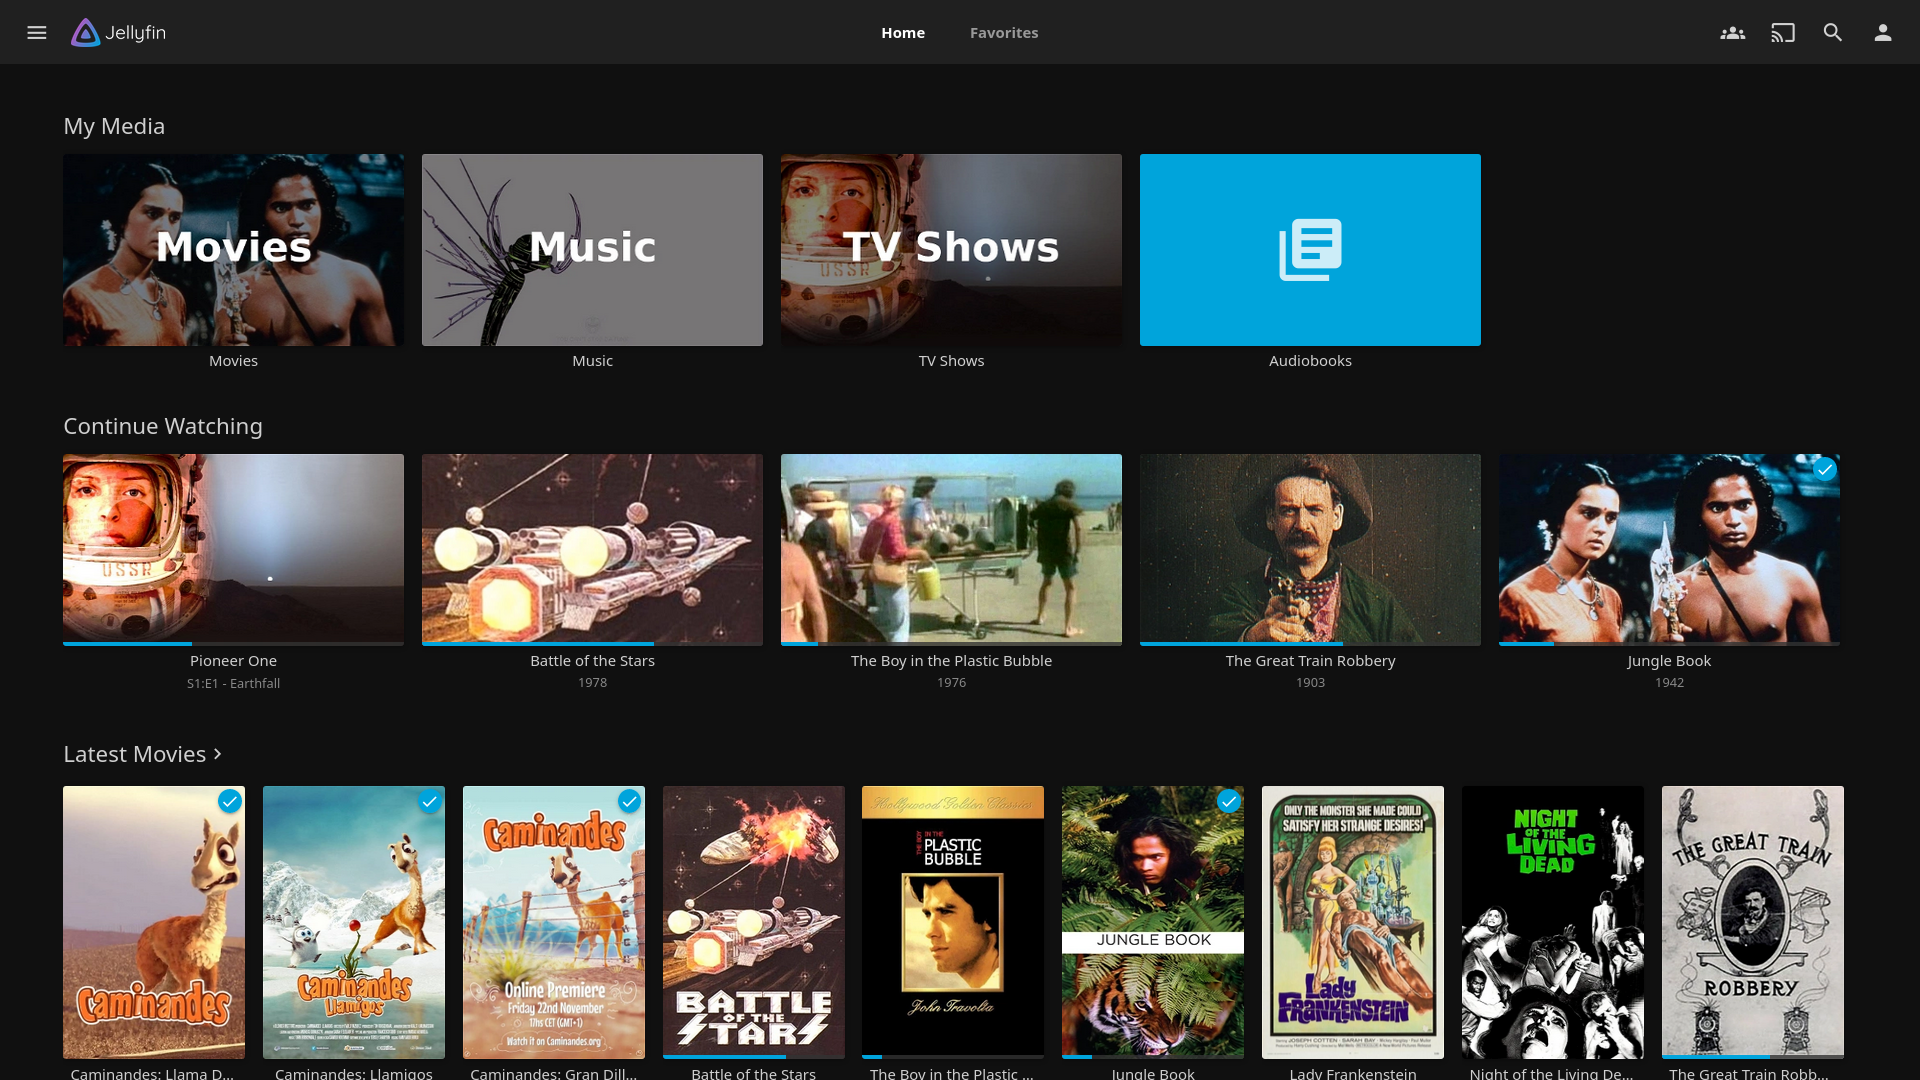
Jellyfin is a client-server solution for organizing and streaming media. It supports movies, TV shows, music, books, and photos, but I only use it for movies, TV shows, and its SyncPlay feature. It is often used in conjunction with Sonarr and Radarr for their automated organization capabilities—but I have yet to try this.
Docker Compose #
I commented out uid:gid to use the default user.
services:
  jellyfin:
    image: jellyfin/jellyfin
    container_name: jellyfin
    # Optional - specify the uid and gid you would like Jellyfin to use instead of root
    # user: uid:gid
    ports:
      - 8096:8096/tcp
      - 7359:7359/udp
    volumes:
      - ./config:/config
      - ./cache:/cache
      - type: bind
        source: ./media
        target: /media
      - type: bind
        source: ./media2
        target: /media2
        read_only: true
      # Optional - extra fonts to be used during transcoding with subtitle burn-in
      - type: bind
        source: ./fonts
        target: /usr/local/share/fonts/custom
        read_only: true
    restart: 'unless-stopped'
    # Optional - alternative address used for autodiscovery
    environment:
      - JELLYFIN_PublishedServerUrl=http://example.com
    # Optional - may be necessary for docker healthcheck to pass if running in host network mode
    extra_hosts:
      - 'host.docker.internal:host-gateway'
BookStack #
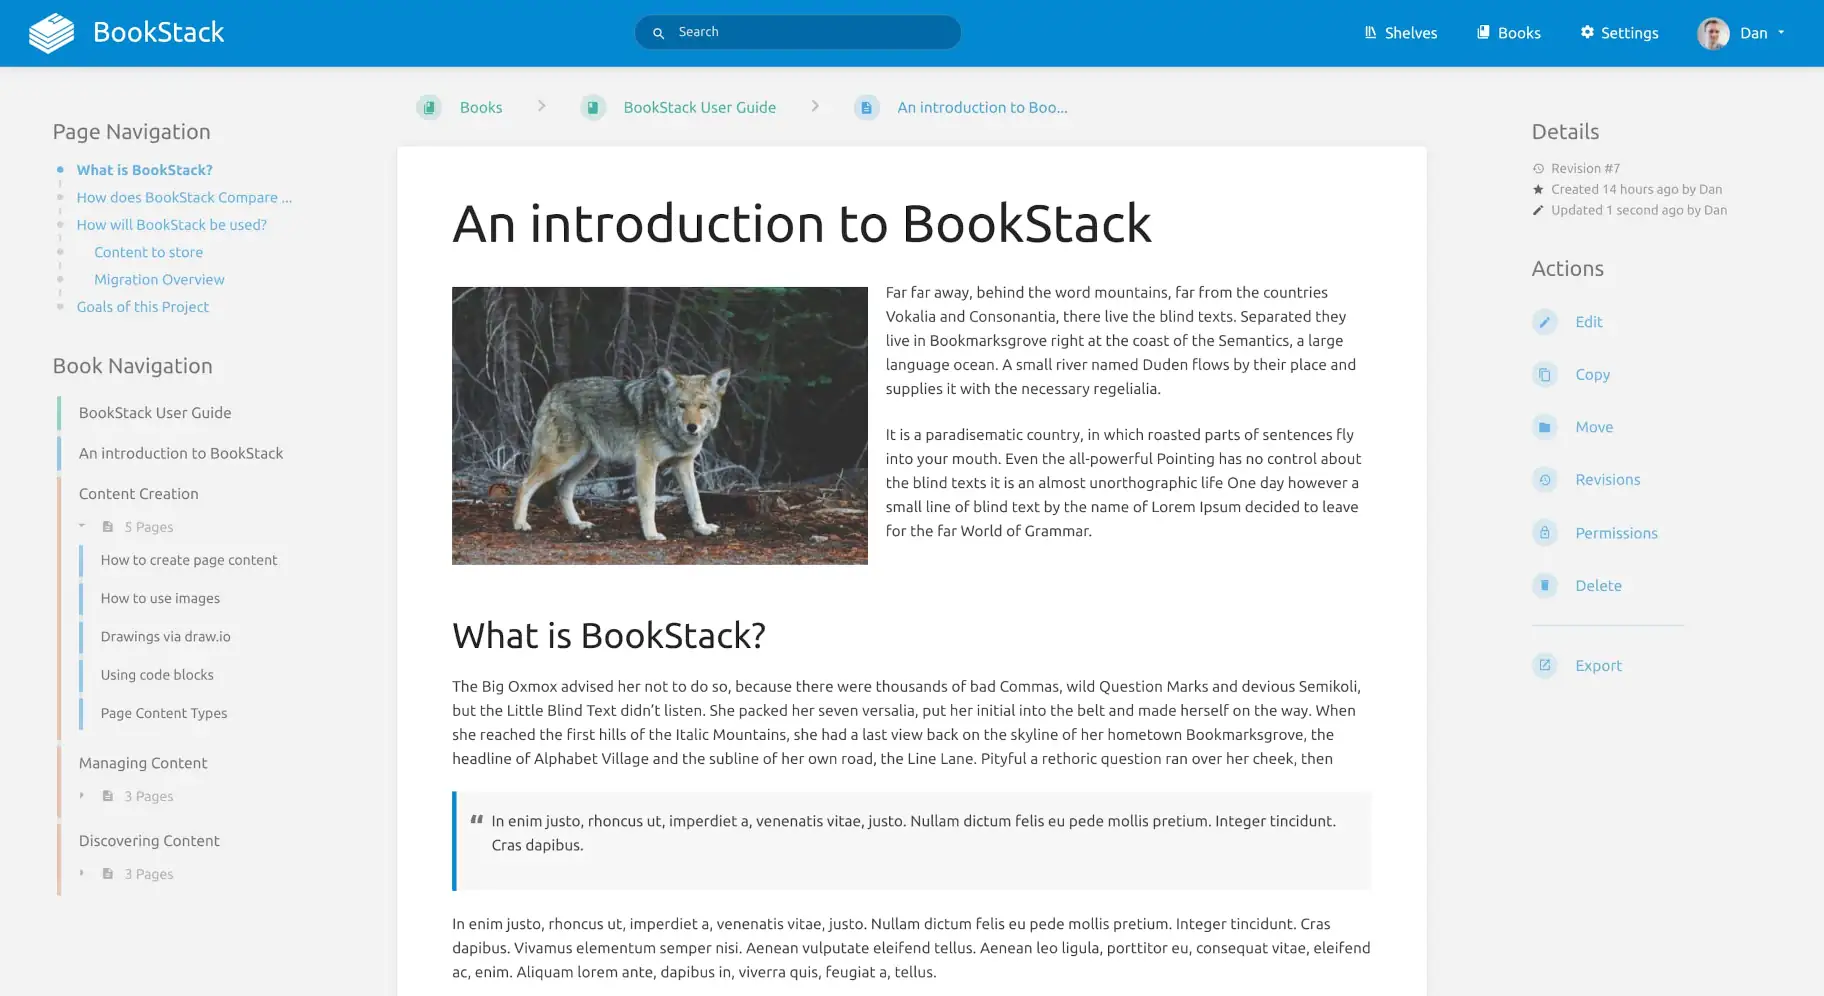
I wanted to have an internal documentation solution. I have used DokuWiki in the past so I decided to try BookStack. It is certainly a lot nicer to look at, and comes with a built in visual editor.
BookStack lives up to its name with a unique organization style:
The principles of storing information within BookStack is based of the ideas of a normal stack of books. Just like normal books, BookStack books can contain chapters and pages. You start off by creating a book which acts as the highest level of categorisation. Ideally you’d have separate books for separate topics.
Within a book you can directly create pages or you can first create chapters. Chapters provide an additional level of page grouping to keep pages organised but are optional. All the information you write is held within pages. Although books and chapters do not hold information they can be given a short description to assist with searching and visibility.
Once you start to stack-up books you can start to use Bookshelves to organise your Books. Bookshelves can contain multiple books and a single book could be placed on multiple Bookshelves. — BookStack
It’s a little bit convoluted and I prefer DokuWiki’s namespace system.
Another key difference is that DokuWiki is database-less, making it always readable and highly portable. BookStack, being database-dependent, lacks the same resilience in scenarios where database downtime or migration would be problematic.
Docker Compose #
There are a fair bit of parameters that have to be tweaked. Some sensitive parameters like passwords need to be set. To avoid having these be stored permanently in the Compose file, you can pull them from a file with Docker secrets.
You will need to generate and application key with:
docker run -it --rm --entrypoint /bin/bash lscr.io/linuxserver/bookstack:latest appkey
Unlike the Flame Compose file, I did not take advantage of Docker secrets, and set the passwords declaratively. I will be revisiting this in the future.
services:
  bookstack:
    image: lscr.io/linuxserver/bookstack:latest
    container_name: bookstack
    secrets:
      - password # optional but required for (1)
    environment:
      - PUID=<PUID>
      - PGID=<PGID>
      - TZ=<TIMEZONE>
      - APP_URL=<URL>
      - APP_KEY=<APP_KEY>
      - DB_HOST=<HOSTNAME>
      - DB_PORT=3306
      - DB_USERNAME=<USER>
      - DB_PASSWORD=<PASSWORD>
      - DB_DATABASE=<NAME>
    volumes:
      - ~/bookstack/config:/config
    ports:
      - 6875:80
    restart: unless-stopped

  mariadb:
    image: lscr.io/linuxserver/mariadb:11.4.5
    container_name: mariadb
    environment:
      - PUID=<PUID>
      - PGID=<PGID>
      - TZ=<TIMEZONE>
      - MYSQL_ROOT_PASSWORD=<PASSWORD>
      - MYSQL_DATABASE=<NAME>
      - MYSQL_USER=<USER>
      - MYSQL_PASSWORD=<PASSWORD>
    volumes:
      - ./bookstack_db_data:/config
    restart: unless-stopped
Paperless-ngx #
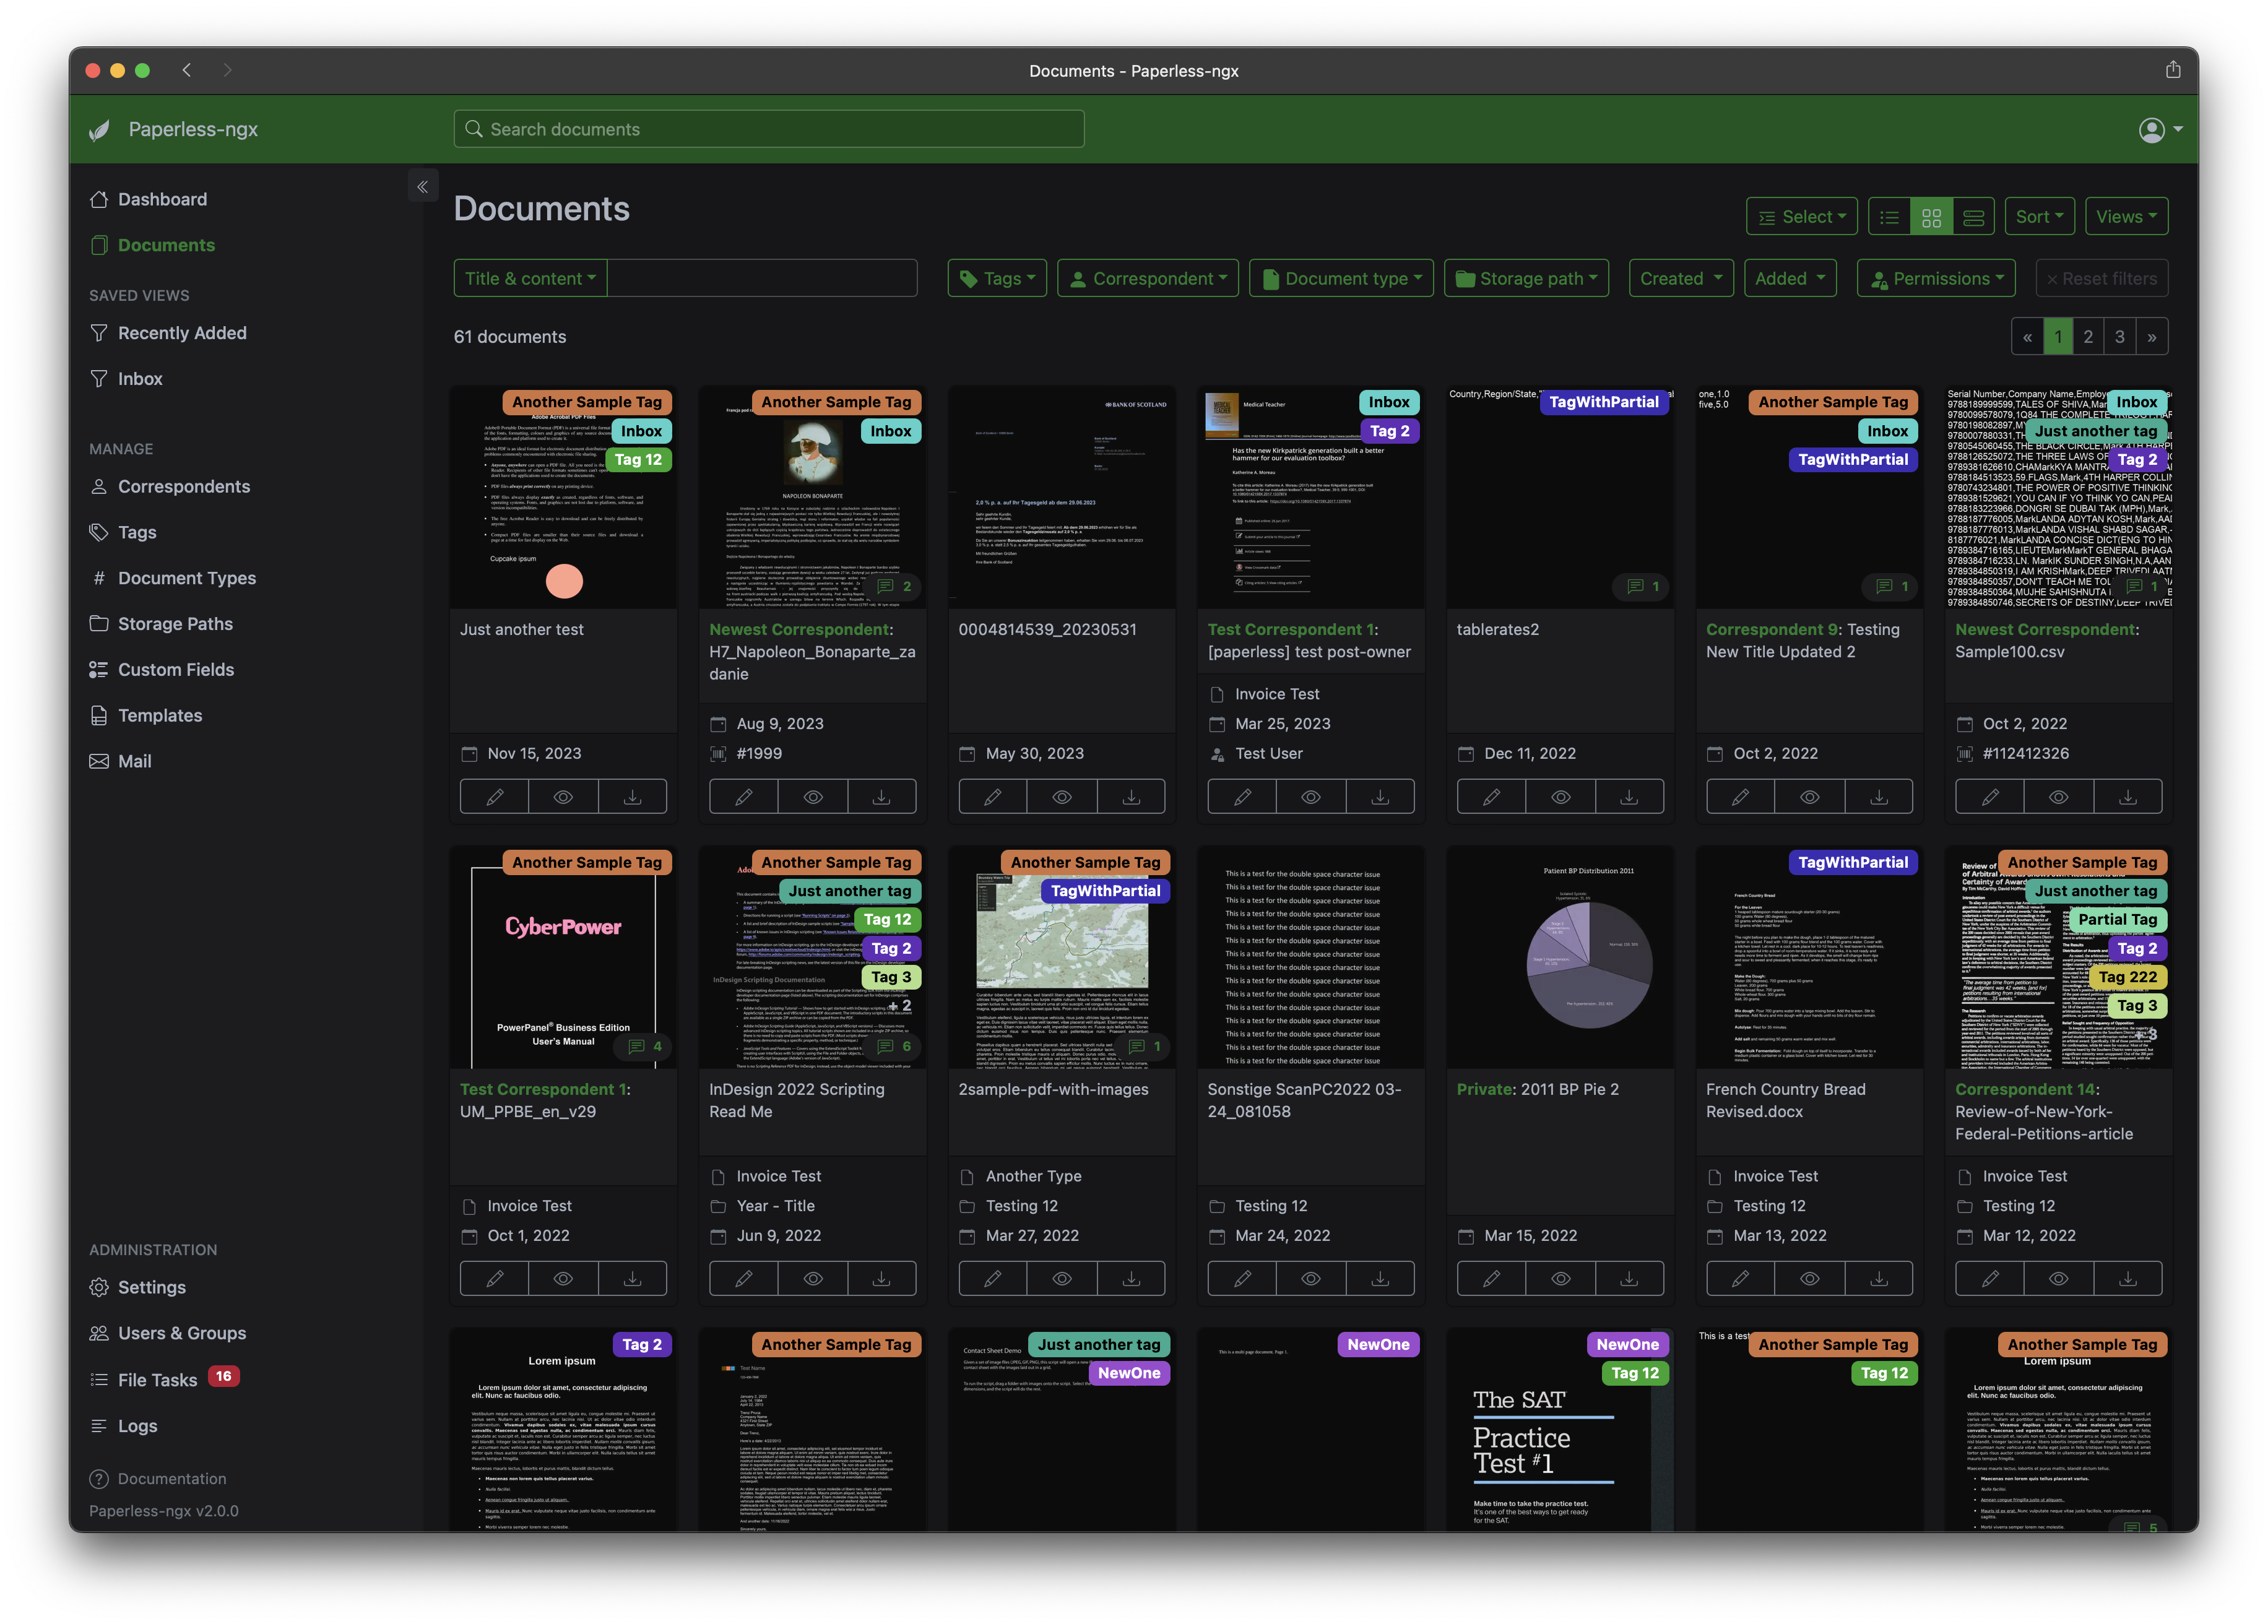
Paperless-ngx is a community-supported open-source document management system that transforms your physical documents into a searchable online archive so you can keep, well, less paper. — Paperless-ngx
I don’t use Paperless-ngx to replace any of my current paperwork. Instead, it acts as a reliable backup for those documents. For paperwork I no longer need, it serves as an excellent archive. While there are many file storage options available, Paperless-ngx stands out because it offers a wide range of features specifically tailored to the kinds of important documents it’s designed to store.
Docker Compose #
Gotenberg and Tika are both included in the default Compose file.
- Gotenberg converts multiple different file types to the PDF format.
- Tika is used to extract text and metadata from multiple different file types.
services:
  broker:
    image: docker.io/library/redis:8
    restart: unless-stopped
    volumes:
      - redisdata:/data
  db:
    image: docker.io/library/postgres:17
    restart: unless-stopped
    volumes:
      - pgdata:/var/lib/postgresql/data
    environment:
      POSTGRES_DB: <NAME>
      POSTGRES_USER: <USER>
      POSTGRES_PASSWORD: <PASSWORD>
  webserver:
    image: ghcr.io/paperless-ngx/paperless-ngx:latest
    restart: unless-stopped
    depends_on:
      - db
      - broker
      - gotenberg
      - tika
    ports:
      - "8010:8000"
    volumes:
      - data:/usr/src/paperless/data
      - media:/usr/src/paperless/media
      - ./export:/usr/src/paperless/export
      - ./consume:/usr/src/paperless/consume
    env_file: docker-compose.env
    environment:
      PAPERLESS_REDIS: redis://broker:6379
      PAPERLESS_DBHOST: db
      PAPERLESS_TIKA_ENABLED: 1
      PAPERLESS_TIKA_GOTENBERG_ENDPOINT: http://gotenberg:3000
      PAPERLESS_TIKA_ENDPOINT: http://tika:9998
  gotenberg:
    image: docker.io/gotenberg/gotenberg:8.20
    restart: unless-stopped
    # The gotenberg chromium route is used to convert .eml files. We do not
    # want to allow external content like tracking pixels or even javascript.
    command:
      - "gotenberg"
      - "--chromium-disable-javascript=true"
      - "--chromium-allow-list=file:///tmp/.*"
  tika:
    image: docker.io/apache/tika:latest
    restart: unless-stopped
volumes:
  data:
  media:
  pgdata:
  redisdata:
Nextcloud #
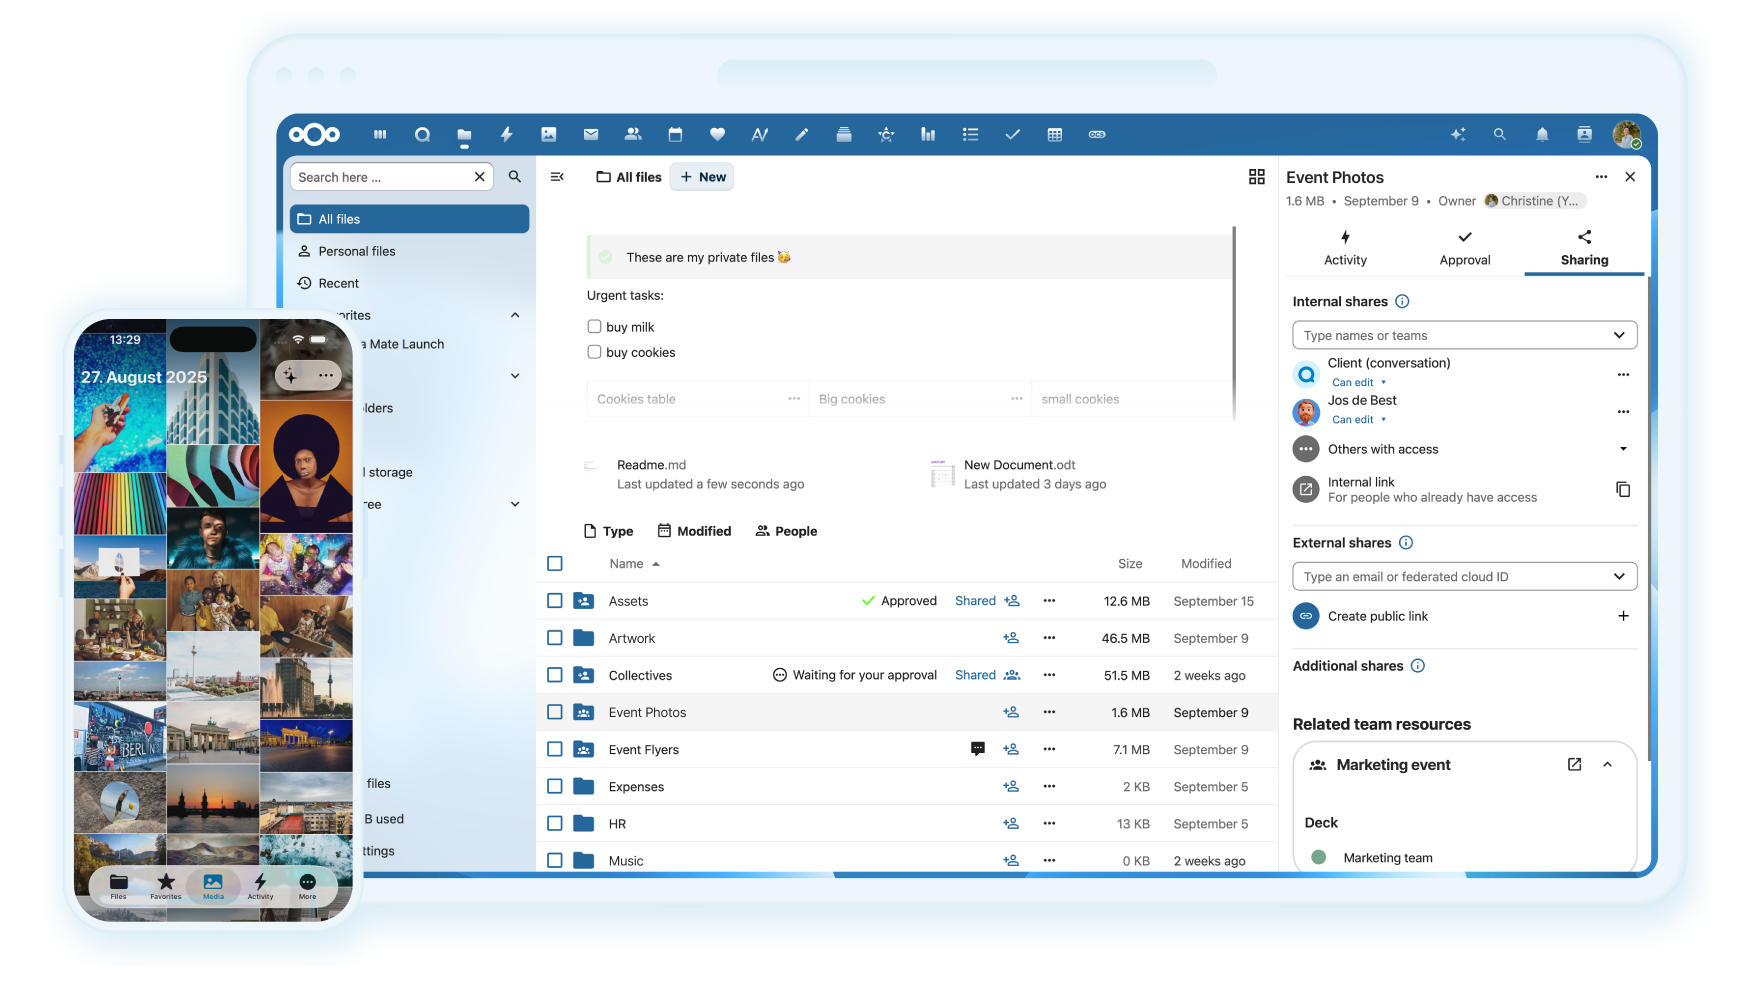
Nextcloud aims to be a FOSS, all-in-one (AIO) alternative to Google Drive with full feature parity. While it’s certainly impressive in its scope, this broad ambition also makes it a large and resource-heavy application.
Docker Compose #
By default, its expected to be hosted and accessed publicly. There is a guide on how to use the AIO image with Tailscale, but in my experience, it’s been buggy and cumbersome to set up.
I’ve had a much easier time using LinuxServer.io’s image:
services:
  nextcloud:
    image: lscr.io/linuxserver/nextcloud:latest
    container_name: nextcloud
    environment:
      - PUID=<PUID>
      - PGID=<PGID>
      - TZ=<TIMEZONE>
      - NEXTCLOUD_TRUSTED_DOMAINS=<DOMAIN>
    volumes:
      - ~/nextcloud/config:/config
      - ~/nextcloud/data:/data
    ports:
      - 8443:443
    restart: unless-stopped
OwnTracks #
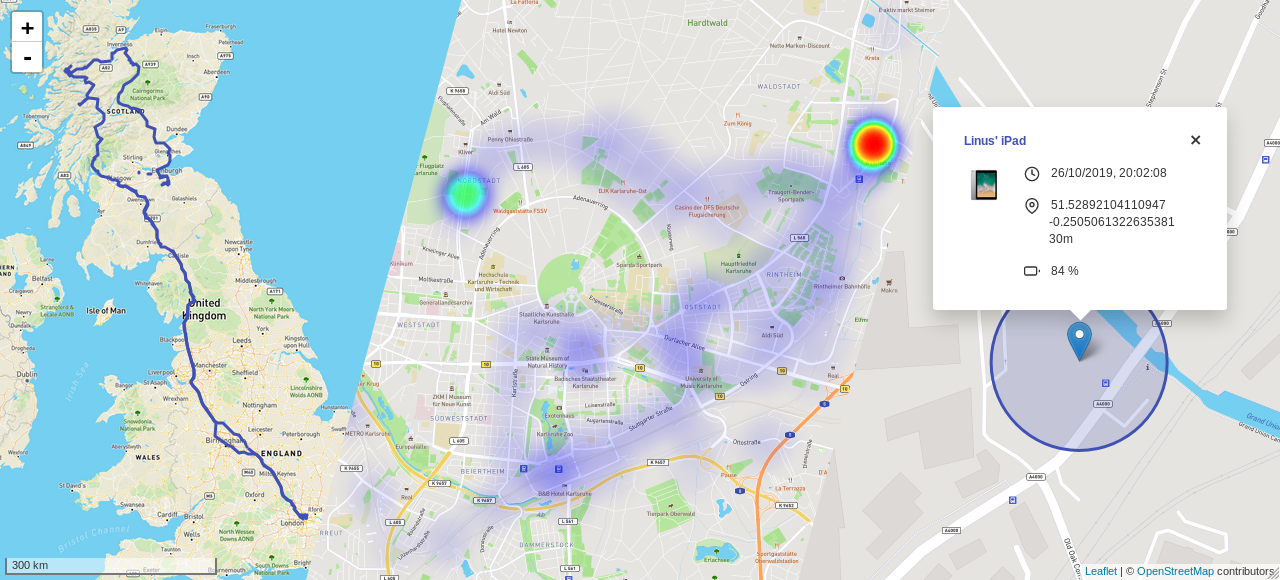
OwnTracks is a self-hosted location tracker. Its primary use case is tracking walks throughout the day, but it has an option to share your location with friends that subscribe to its MQTT server.
Docker Compose #
OwnTracks has a quicksetup, but it expects to be installed on a VPS or accessed publicly. There are few changes you have to make for it to work with Tailscale. This compose configuration worked for me:
services:
  otrecorder:
    image: owntracks/recorder
    ports:
    volumes:
      - ./store:/store
      - 8083:8083
    restart: unless-stopped
    environment:
      OTR_HOST: mosquitto

  frontend:
    image: owntracks/frontend
    volumes:
      - ./frontend/config.js:/usr/share/nginx/html/config/config.js
    ports:
      - 8080:80
    restart: unless-stopped
    environment:
      - SERVER_HOST=otrecorder
      - SERVER_PORT=8083

  mosquitto:
    image: eclipse-mosquitto
    ports:
      - 1883:1883
      - 8883:8883
    volumes:
      - ./mosquitto/data:/mosquitto/data
      - ./mosquitto/logs:/mosquitto/logs
      - ./mosquitto/conf:/mosquitto/config
    restart: unless-stopped
Mobile App #
To connect to the MQTT server with the mobile app:
- Navigate to
Preferences - Set
Hostto the Tailscale IP of your server - Set
Portto 1883 1 - Toggle
TLSoff - Navigate to
Map - Hit the publish button (looks like an upload icon)
Owncast #
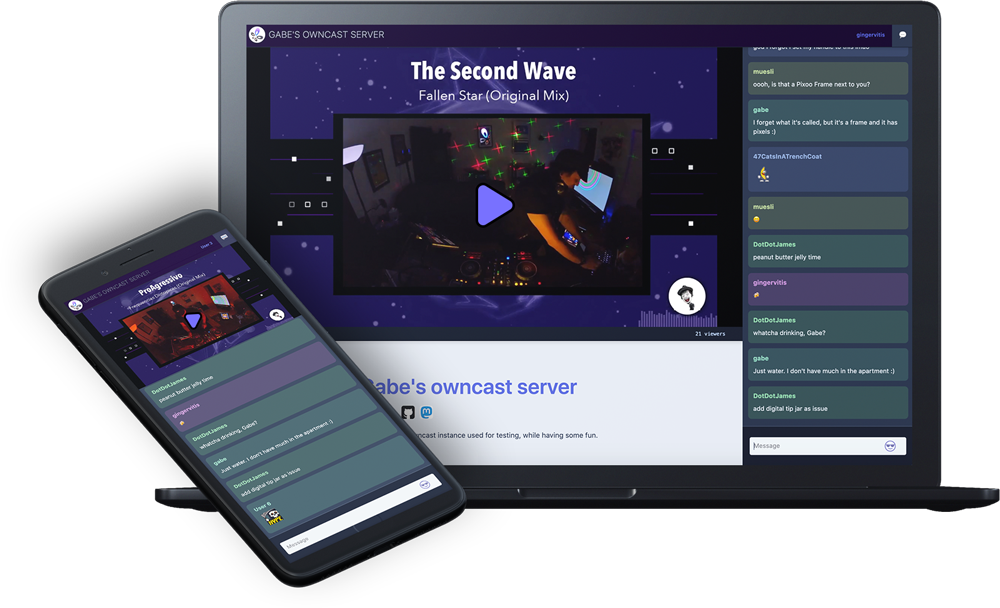
Owncast is a self-hosted streaming solution. It’s really simple to use and neatly integrates with Open Broadcaster Software (OBS).
Docker Compose #
services:
  owncast:
    image: owncast/owncast:latest
    ports:
      - "8085:8080"
      - "1935:1935"
    volumes:
      - ./data:/app/data
Uptime Kuma #
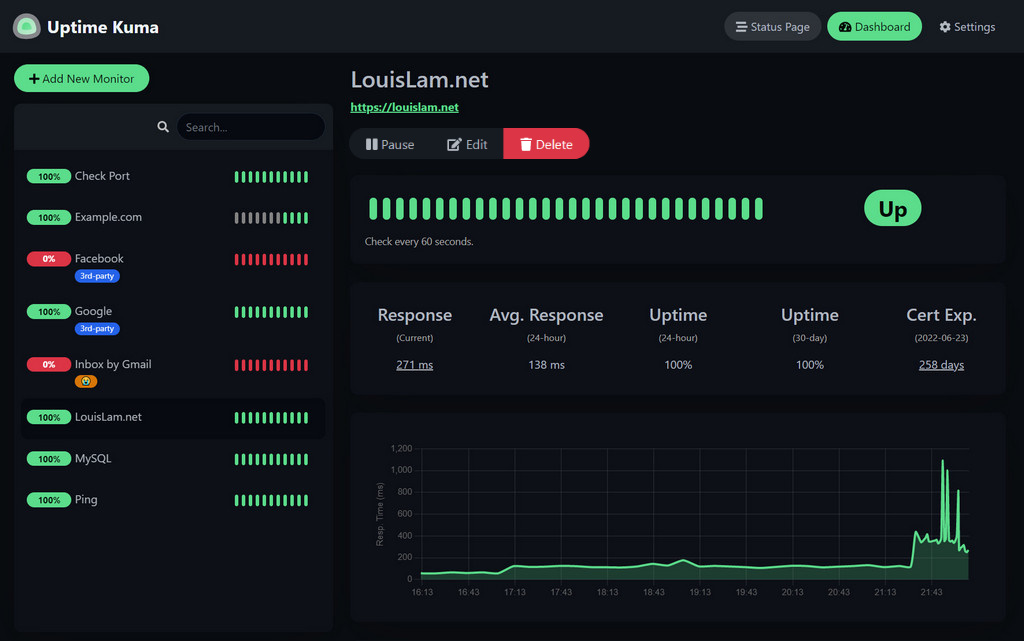
After setting up all these services, I wanted a way to monitor them and easily see which sites were up and which were down. Uptime Kuma is a great tool for tracking the uptime of all your sites. It can do this through multiple methods, but I use the default HTTP(s) ping. It can also be configured to send notifications to various platforms.
Docker Compose #
version: '3'
services:
  uptime-kuma:
    image: louislam/uptime-kuma:1
    container_name: uptime-kuma
    restart: always
    ports:
      - "3010:3001"
    volumes:
      - uptime-kuma:/app/data
      - /var/run/docker.sock:/var/run/docker.sock

volumes:
  uptime-kuma:
Authentik #
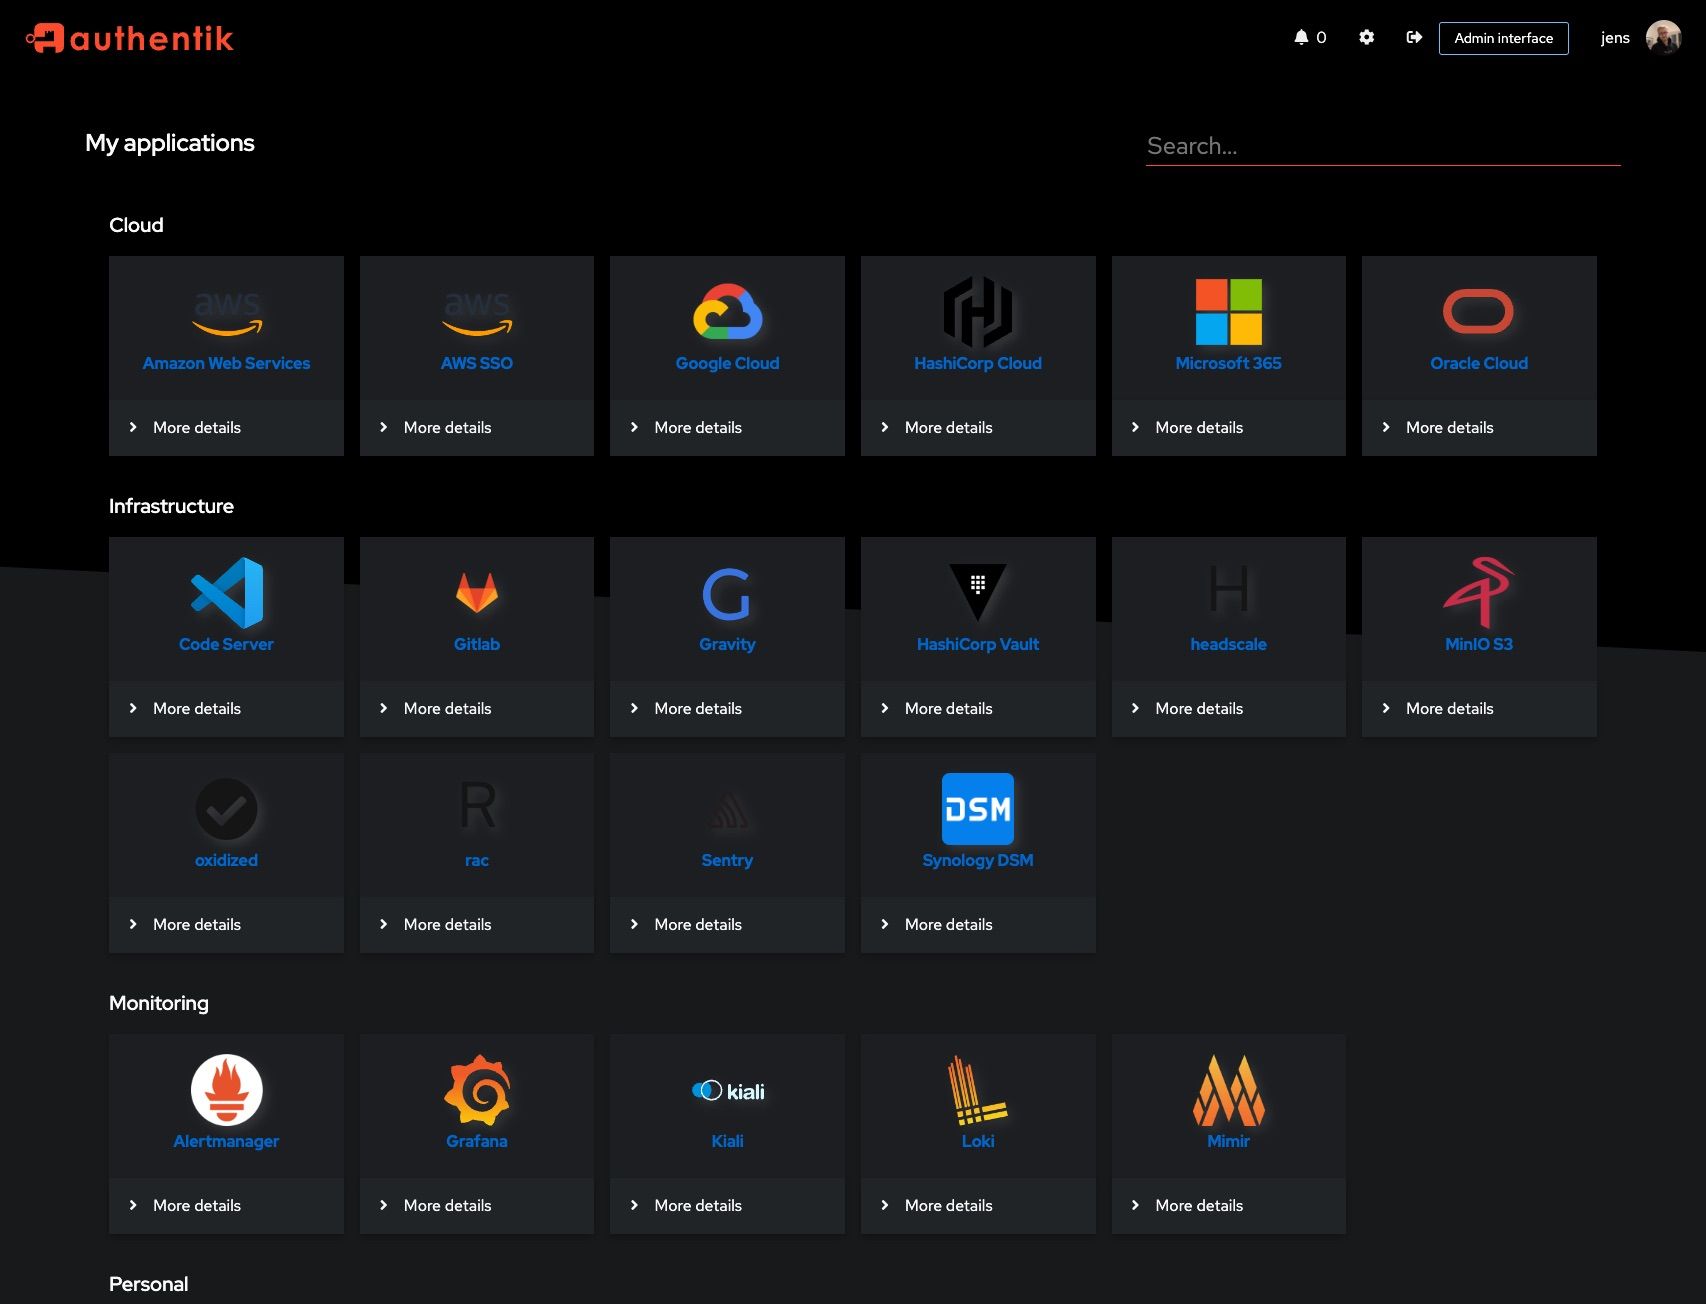
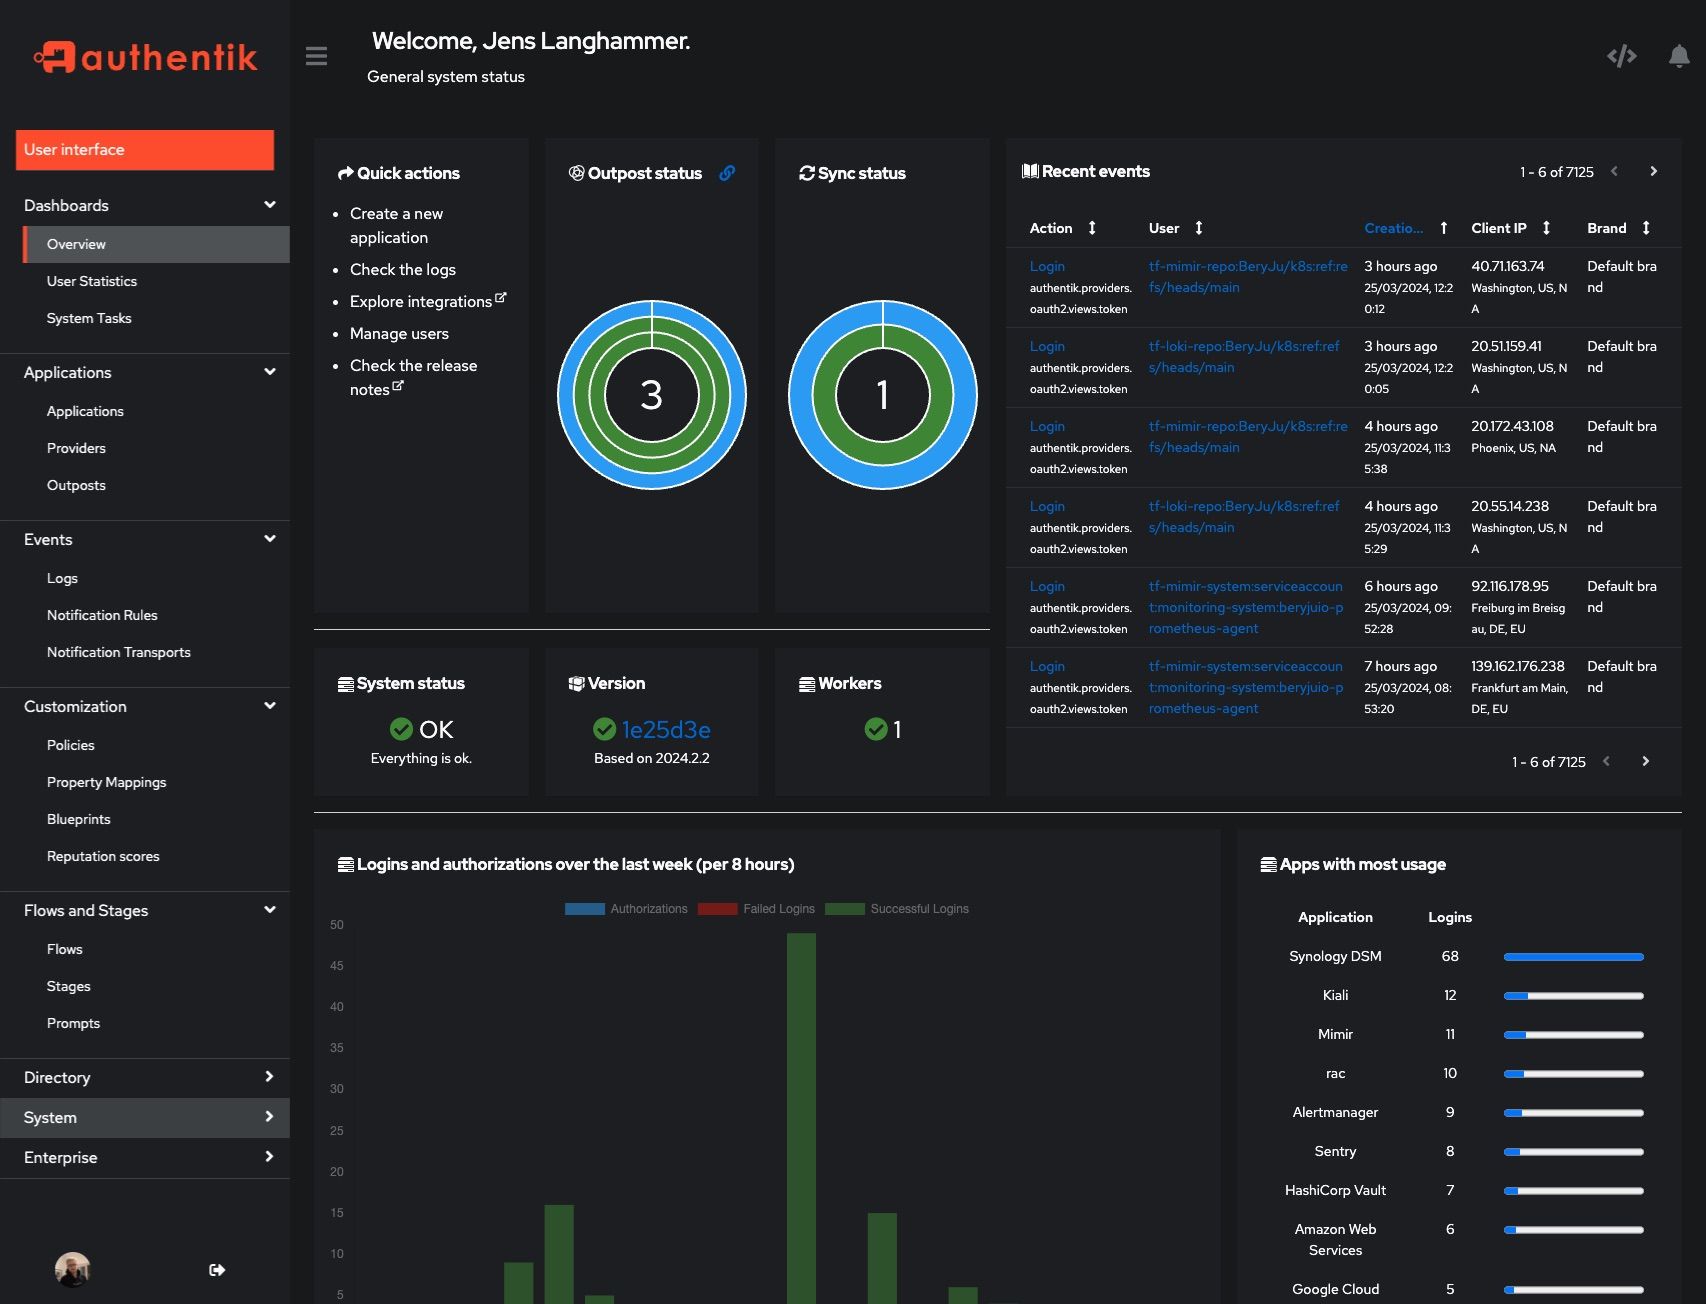
Alright, now that I’ve got a ton of different applications, logging into each one’s unique login portal—with its own set of credentials—gets pretty tedious pretty fast. Authentik is a SSO service for all your programs. Simply log into Authentik once, and you can use that identity to access all your other login portals afterward.
Adding Authentik support to each of your services is a manual process, and it varies depending on the authentication method the service uses. The overwhelming majority of the services I set up rely on OAuth2/OIDC, which Authentik handles well. So far, I’ve only integrated it with Beszel—it wasn’t the quickest setup, but the seamless login experience afterward was definitely worth it. I’ll be fully implementing this across my homelab in the next iteration.
Docker Compose #
Authentik require a password and secret key written to a .env file:
echo "PG_PASS=$(openssl rand -base64 36 | tr -d '\n')" >> .env
echo "AUTHENTIK_SECRET_KEY=$(openssl rand -base64 60 | tr -d '\n')" >> .env
Their latest Docker Compose file is always available with:
wget https://docs.goauthentik.io/docker-compose.yml
services:
  postgresql:
    image: docker.io/library/postgres:16-alpine
    restart: unless-stopped
    healthcheck:
      test: ["CMD-SHELL", "pg_isready -d $${POSTGRES_DB} -U $${POSTGRES_USER}"]
      start_period: 20s
      interval: 30s
      retries: 5
      timeout: 5s
    volumes:
      - database:/var/lib/postgresql/data
    environment:
      POSTGRES_PASSWORD: ${PG_PASS:?database password required}
      POSTGRES_USER: ${PG_USER:-authentik}
      POSTGRES_DB: ${PG_DB:-authentik}
    env_file:
      - .env
  redis:
    image: docker.io/library/redis:alpine
    command: --save 60 1 --loglevel warning
    restart: unless-stopped
    healthcheck:
      test: ["CMD-SHELL", "redis-cli ping | grep PONG"]
      start_period: 20s
      interval: 30s
      retries: 5
      timeout: 3s
    volumes:
      - redis:/data
  server:
    image: ${AUTHENTIK_IMAGE:-ghcr.io/goauthentik/server}:${AUTHENTIK_TAG:-2025.6.4}
    restart: unless-stopped
    command: server
    environment:
      AUTHENTIK_SECRET_KEY: ${AUTHENTIK_SECRET_KEY:?secret key required}
      AUTHENTIK_REDIS__HOST: redis
      AUTHENTIK_POSTGRESQL__HOST: postgresql
      AUTHENTIK_POSTGRESQL__USER: ${PG_USER:-authentik}
      AUTHENTIK_POSTGRESQL__NAME: ${PG_DB:-authentik}
      AUTHENTIK_POSTGRESQL__PASSWORD: ${PG_PASS}
    volumes:
      - ./media:/media
      - ./custom-templates:/templates
    env_file:
      - .env
    ports:
      - "${COMPOSE_PORT_HTTP:-9000}:9000"
      - "${COMPOSE_PORT_HTTPS:-9443}:9443"
    depends_on:
      postgresql:
        condition: service_healthy
      redis:
        condition: service_healthy
  worker:
    image: ${AUTHENTIK_IMAGE:-ghcr.io/goauthentik/server}:${AUTHENTIK_TAG:-2025.6.4}
    restart: unless-stopped
    command: worker
    environment:
      AUTHENTIK_SECRET_KEY: ${AUTHENTIK_SECRET_KEY:?secret key required}
      AUTHENTIK_REDIS__HOST: redis
      AUTHENTIK_POSTGRESQL__HOST: postgresql
      AUTHENTIK_POSTGRESQL__USER: ${PG_USER:-authentik}
      AUTHENTIK_POSTGRESQL__NAME: ${PG_DB:-authentik}
      AUTHENTIK_POSTGRESQL__PASSWORD: ${PG_PASS}
    # `user: root` and the docker socket volume are optional.
    # See more for the docker socket integration here:
    # https://goauthentik.io/docs/outposts/integrations/docker
    # Removing `user: root` also prevents the worker from fixing the permissions
    # on the mounted folders, so when removing this make sure the folders have the correct UID/GID
    # (1000:1000 by default)
    user: root
    volumes:
      - /var/run/docker.sock:/var/run/docker.sock
      - ./media:/media
      - ./certs:/certs
      - ./custom-templates:/templates
    env_file:
      - .env
    depends_on:
      postgresql:
        condition: service_healthy
      redis:
        condition: service_healthy

volumes:
  database:
    driver: local
  redis:
    driver: local
-
Port 1883 is normally unencrypted, but since I am connecting with a VPN (Tailscale), this traffic is encrypted. ↩︎